macOS Monterey: How to set up and use Focus on your Mac
[ad_1]
Thanks to the internet and modern-day communication tools, it’s very easy to get in touch with someone—maybe it’s too easy. With Focus in macOS Monterey, you can set it up so that you aren’t interrupted by instant messages, calls, and alerts, allowing you to focus on whatever you’re doing on your Mac.
Focus is basically an expansion of options that were originally available in the Do Not Disturb feature that’s already in macOS. To make Focus suitable for your situation, you can adjust its preferences, which we’ll go over in this article.
[Learn more about macOS Monterey here.]
How to turn on Focus manually
- In the menu bar, click the Control Center icon. It’s a pair of black and white switches. ‘
- You can click the Focus icon and that will turn on Focus until you turn it off. If you want more options, click the Focus label or the arrow.
- The Window will switch to the Focus window.
- If you don’t have a profile set up, you can select an option under the Do Not Disturb header. If you do have profiles, you can select one of them.
To turn off Focus, go to the Control Center menu bar, and click the Do Not Disturb icon.
If you want to set up Focus to turn on automatically, or you want to define the conditions for a Focus session when you manually turn it on, you need to set up Focus profiles. Read on to learn more.
Set up a Focus profile
The default setting has three choices. If you simply select Do Not Disturb, it stays on until you manually turn it off. Or you can choose to set it for one hour, or until the evening.
Besides the default, Focus allows you to set up profiles for different situations. For example, you can have a profile you use for your lunch break or for your workout—basically any time period of time you want to be uninterrupted.
The settings for Focus are in the Notifications & Focus system preference. (You can also select Focus Preferences when you click the Do Not Focus/Disturb button in Control Center.) Here’s how to set up a profile.
When creating a custom Focus profile, you need to seelct an icon and color, and give it a name.
IDG
- In the Notifications & Focus system preference, click on the Focus tab.
- In the left column are your profiles. To create a new profile, click on the + button at the bottom of the column. A pop-up will appear with six options: Custom, Gaming, Mindfulness, Personal, Reading, and Work. These profiles (except Custom) have only a name, color, and icon assigned to them. So if you want to create, say, a gaming profile to begin with, you can select Gaming. Or select Custom and you can customize it as you like. Select a profile.
- If you selected Custom, you get to choose a color and icon to help you quickly spot your profile. You also need to fill in a name in the field below the icon at the top. Click Add when you’re done.
Now that you’ve made a profile, here’s how to adjust its settings.
Adjust Notifications settings for a Focus profile
- In the Notifications & Focus system preference, click on the Focus tab.
- Select the profile in the left column that you want to modify.
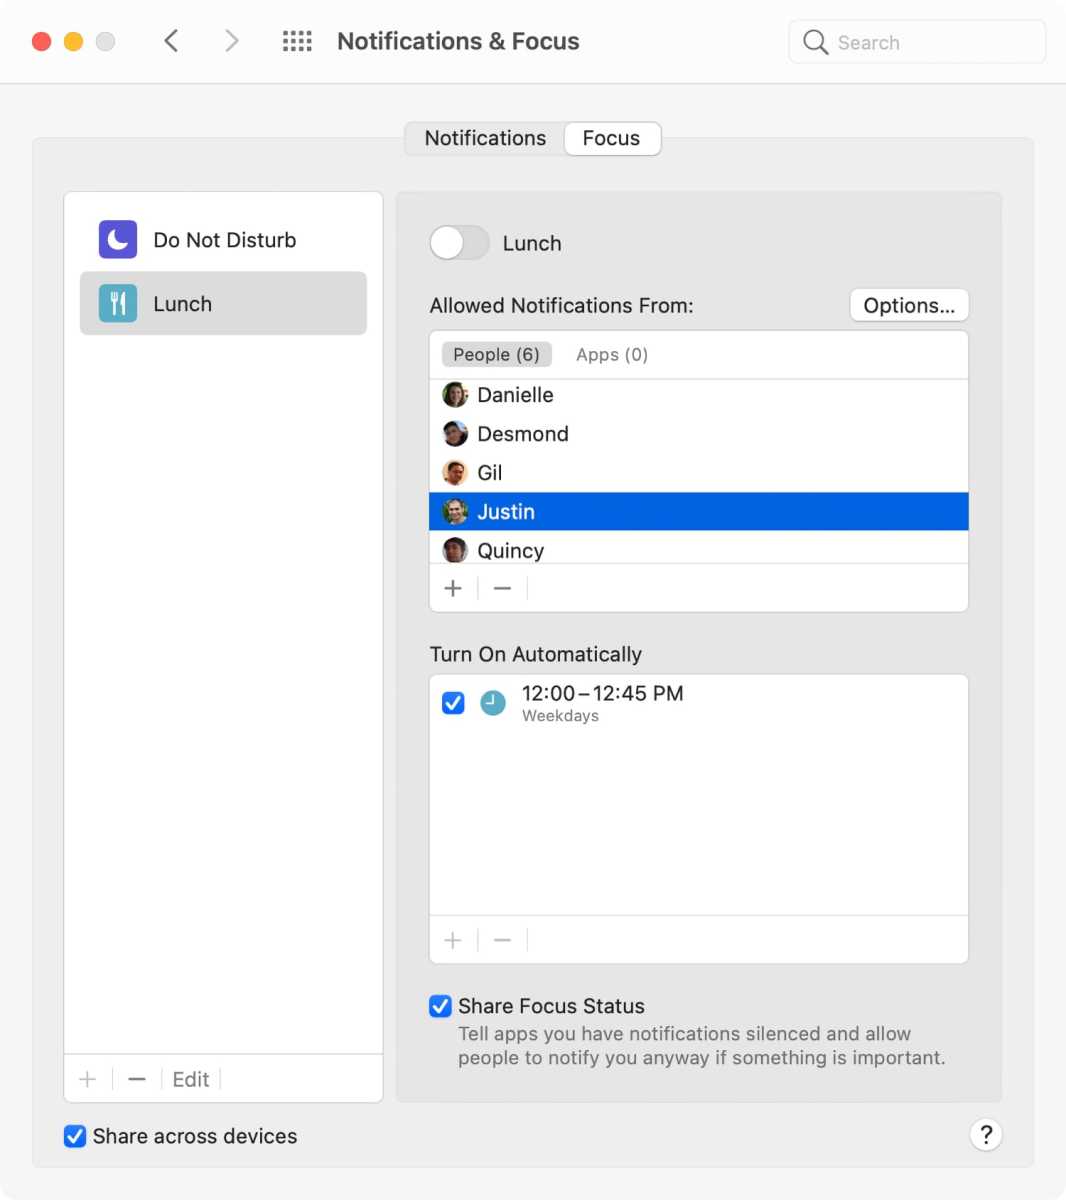
- In the box for “Allowed Notifications From,” you can set which contacts and apps are allowed to notify you while this particular Focus profile is being used.
- You can allow specific contacts to notify you while the Focus profile is on. Click on People, then click the + button at the bottom of the box. A directory of your contacts will appear, and you can select people by highlighting the contact can clicking the Add button.
- You can allow specific apps to notify you. Click on Apps, then click the + button at the bottom of the box. A list of your apps appears and you can highlight the app you want and click Add to allow its notifications.

You can pick People and Apps whose notifications will be let through during your Focus session.
IDG
To remove a contact or app from the list of allowed notifications, click People or Apps, highlight the one you want to remove, then click the — button at the bottom of the box.
Click on the Options button, and you can make a few more adjustments:
- Allow time sensitive notifications
- Allow calls from everyone, or you can choose a group that’s based on your groups in the Contacts app
- Allow repeated calls, where a second call made within three minutes from the first call by the same person is allowed to notify you
Adjust the ‘Turn On Automatically’ setting for a Focus profile
You can set up a Focus profile to turn on and off automatically. Here’s how.
- In the Notifications & Focus system preference, click on the Focus tab.
- Select the profile in the left column that you want to modify.
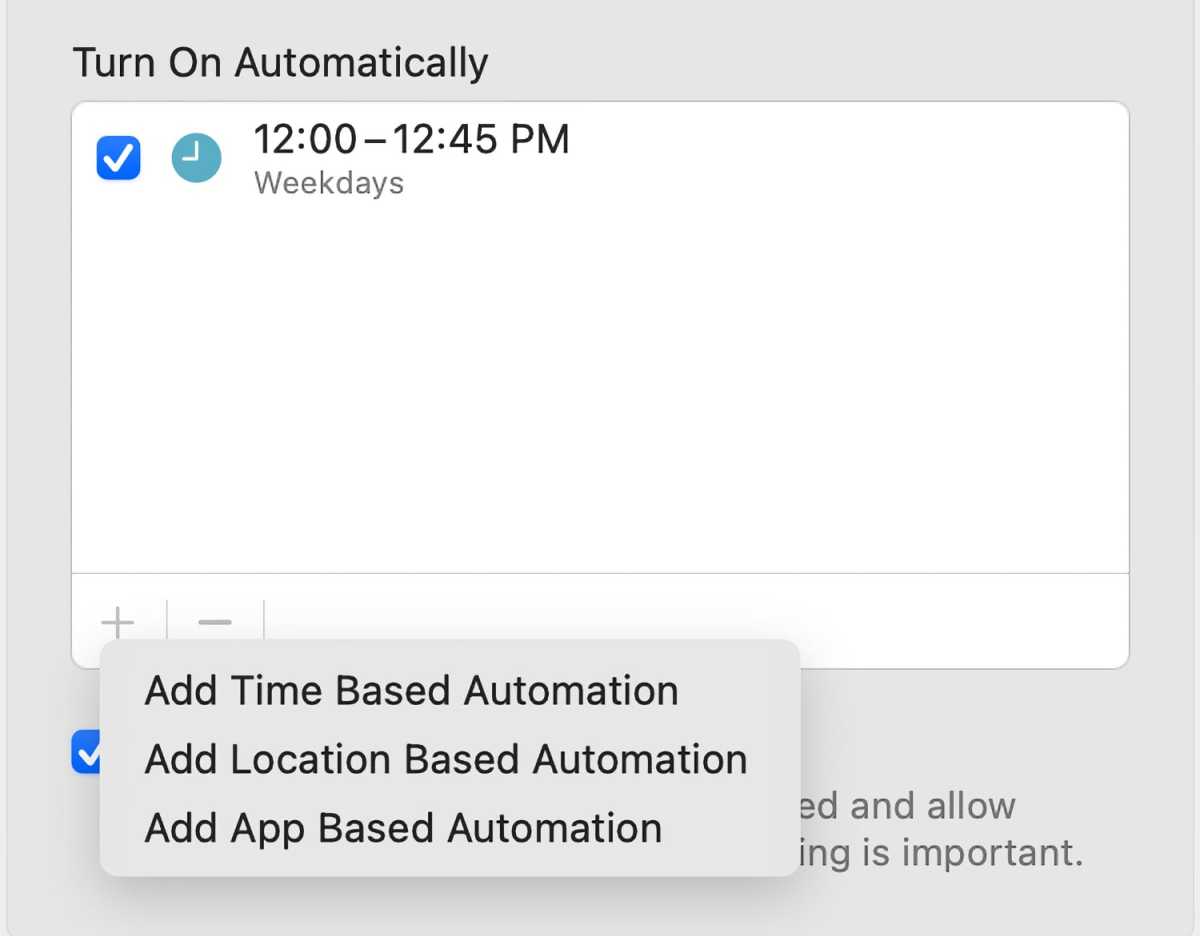
- In the box for “Turn On Automatically,” click the + button. A pop-up will appear and you’ll need to select one of the three conditions:
- Add Time Based Automation: Set a profile to turn on and off based on a time of the day. You will need to set a time range and the days of the week.
- Add Location Based Automation: Set a profile to turn on and off based on a where you are physically. The locations you can set are based on your Favorites in the Maps app. (At the time of this writing using beta 5, the only locations I was allowed to select were Home and Work.)
- Add App Based Automation: Set a profile to turn on and off based on the use of a specific app. A list of your apps will appear and you’ll need to select the one you want.

You can set Focus to turn on automatically based on the time, location, or app.
IDG
You can add multiple conditions to a Focus profile if it suits your needs. For example, you can set up a profile that automatically puts you into Focus when you are at a location and during a specific time while you are there. Just click the + button to add another condition.
To delete a condition, select it in the Turn On Automatically box, and then click the — button.
Share Focus Status
This is a switch at the bottom of the Focus section of the Notifications & Focus system preference. When it’s on, this silences all notifications from apps, and people can notify you “if something is important.”
Roman has covered technology since the early 1990s. His career started at MacUser, and he’s worked for MacAddict, Mac|Life, and TechTV.
[ad_2]
Source link


