Time Machine in Sonoma: Back up and restore external volumes

Time Machine is primarily aimed at backing up and restoring the Data volume in your Mac’s current Boot Volume Group. Although the Time Machine app itself isn’t as flexible as it should be, once you realise that you can also access backups in the Finder, Time Machine backups should be able to cope with most of your needs. However, they may not appear as suitable when backing up other volumes, particularly those on external storage. This article explains how to do that, and how to restore from them.
Add a volume to your backups
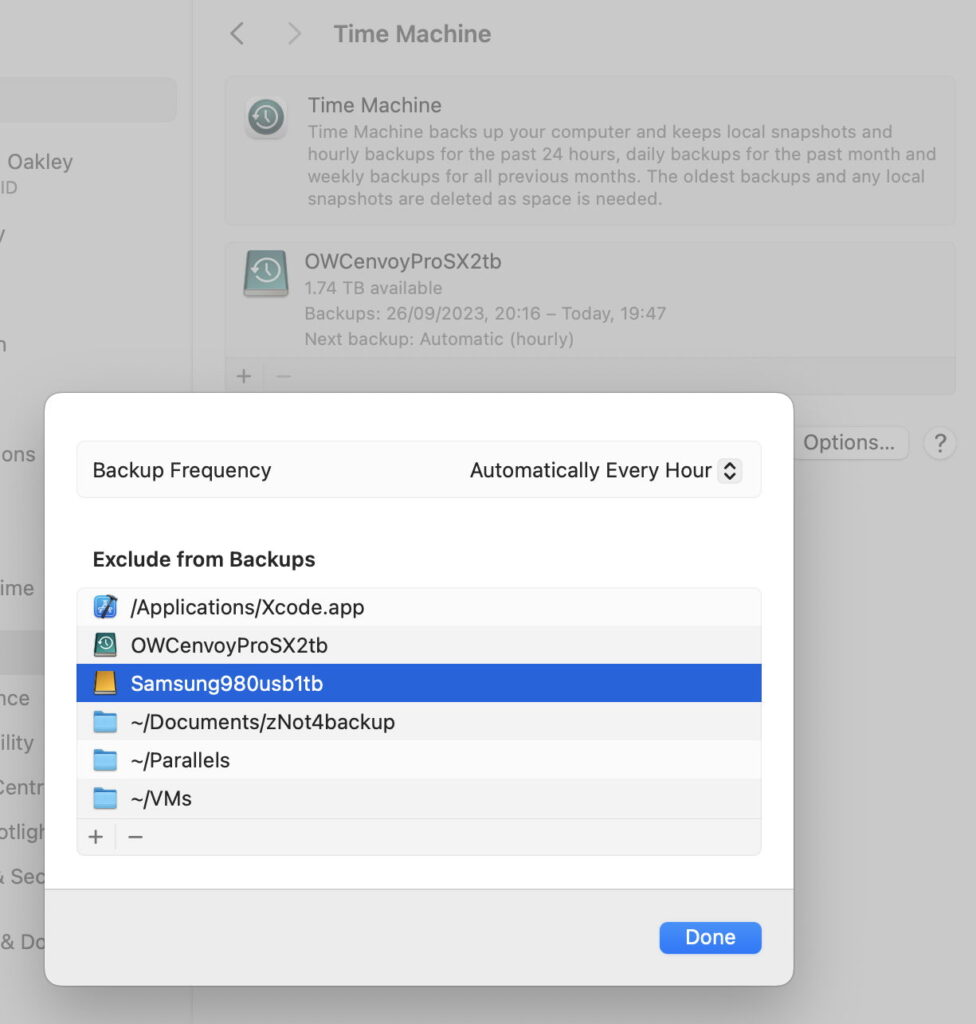
By default, all volumes on external storage are automatically added to the Time Machine backup exclusion list. To add an external volume to the list of items to back up, it’s a simple matter of opening that list using the Options… button in Time Machine settings, selecting the volume you want to add to backups, and clicking on the – tool below to remove it from those exclusions.
You may find Time Machine reluctant to make its next automatic backup; you can either restart your Mac to put the change into effect, or Back Up Now using the Time Machine menu.
The first backup will, of course, be a complete backup, so may take rather longer than the backup of the Data volume. Once that’s complete, view that backup in the Finder and you should see two volumes listed within it, including the external volume you just added.
Restore items to the external volume
When the external volume is mounted, you can restore items from it to the external volume either using the Time Machine app or the Finder interface to the backup, just as you would to items on any other volume. The Time Machine app will only restore items to the same location that they came from, while the Finder interface lets you copy them wherever you wish.
Restore the volume to a different physical store
The worst, and most important, case is when that external volume isn’t available, because it has failed or gone missing. This is where the Time Machine app’s interface becomes opaque and kludgy. When that external volume isn’t mounted, if you open the Time Machine app and step back to a backup that did include the external volume, you won’t see it listed in Locations, and that might give the impression that the backup isn’t available.
Step back to a backup that you know included the external volume, and in Locations select the machine name, here MacStudio. You’ll then see a list of available volumes in that backup, including the Data and your external volume. Control-click on the external volume there to reveal the contextual menu, and select the Restore [volume name] to… command.
You’ll then be put back into the Finder, and a dialog will point out that the original location is missing, and offer to restore the volume elsewhere.
To restore the volume to a different folder, or to a replacement external drive, click on the Choose Location… button and navigate to the location where you want to restore that volume.
The only slight oddity in behaviour here is that the restore doesn’t actually restore the backed up volume as a new volume, but as a folder with the same name as the original volume, together with its entire contents.
If you prefer to use the Finder interface, then all you need do is drag and drop the volume backup to a new location. Again, this will be restored as a folder and not a volume.
In both cases, you will be required to authenticate before the backup is restored.
Summary
Add an external volume by removing it from Time Machine’s exclusion list.
Restore items to their original location using the Time Machine app, or use the Finder interface to copy them anywhere, in the normal way.
In the Time Machine app, restore the whole volume to a different location by selecting the machine name, then selecting the volume and the Restore [volume name] to… command.
Alternatively, drag and drop the volume using the Finder interface.
Time Machine does provide good support for backing up and restoring external volumes. It’s just more opaque than it should be.


