How to evaluate an external SSD

When you’ve finally chosen your new external SSD, whether it comes already assembled or as an enclosure into which you install your own storage, you should evaluate it to check that it does what you expect. There are four steps to this:
Check its protocol support and maximum transfer rate.
Check its SMART health indicator support.
Test whether it Trims with APFS.
Verify its real performance.
Before starting on these, connect the assembled drive to a Thunderbolt 3 port on your Mac using a certified (marked) Thunderbolt 4 cable that you trust, with a length of around 1 metre (3 feet). Avoid using any cable supplied with the drive, as that could only confound test results. When the Finder alerts you to the fact that the drive is unformatted, open Disk Utility and format it using a GUID Partition Map with a single plain and unencrypted APFS volume.
Protocol support
With the drive connected and its APFS volume mounted, select the drive in Disk Utility and check whether that reports its SMART status as being verified, or not supported. Just above that, Disk Utility also states the type of connection, such as PCI-Express, which you should note.
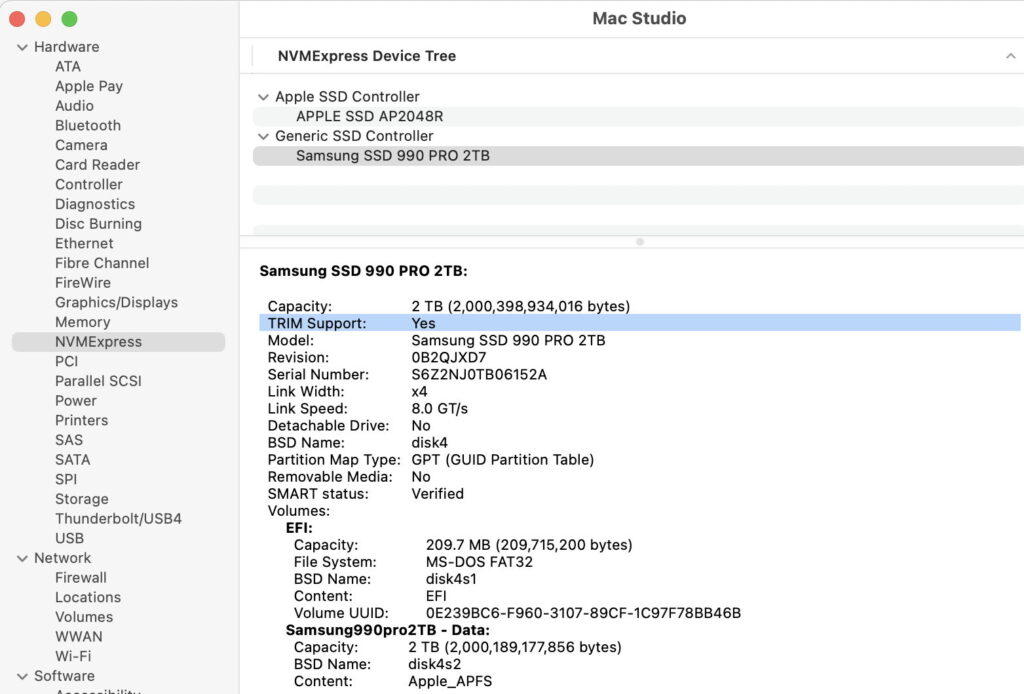
Then open System Information, and browse its Hardware section to discover the protocols that the drive supports. These can be confusing, as the SSD and its enclosure may well have multiple entries in different headings, and some of the information may appear conflicting. For example, System Information may show that some drives connected using USB 3.x have a verified SMART status that doesn’t match Disk Utility’s report, or assessment using a SMART utility such as DriveDx.
USB4 drives operating in Thunderbolt 3 mode can also be confusing. When connected to an Intel Mac (which doesn’t support USB4 itself) they may be reported in the Thunderbolt/USB4 device tree as being USB4.0 operating in Thunderbolt 3 mode, with a link speed of up to 40 Gbit/s, then in the NVMExpress device tree with a link width of x4 and speed of 8.0 GT/s.
SATA drives should appear in the Serial-ATA device tree, even though they might be connected via Thunderbolt 3, and might claim to have verified SMART status when Disk Utility and third-party SMART utilities might not agree. In some cases, you may see a statement of TRIM support as well.
Device trees worth inspecting include: NVMExpress, PCI, SATA, Storage, Thunderbolt/USB4 and USB.
SMART support
There are three sources of information about support for SMART health indicators:
macOS, in Disk Utility and System Information. These are unhelpful as they contain no useful information and may contradict one another.
Mints, in its Disk Check feature. If SMART information is accessible through the diskutil command, this will display a short summary including data written, media errors, percentage used, write/size ratio, and temperature. If those aren’t given, then SMART support isn’t available without third-party software.
Specialist third-party utilities such as DriveDx, which provide fuller information about all available SMART indicators.
Although you can install the SAT SMART kernel extension to enable support for SATA devices, that doesn’t work with those using NVMe; if they don’t support SMART, there’s no way to enable that. It’s also worth noting that Apple silicon Macs will then need to be run at reduced security and allow third-party kernel extensions for that to be used.
Trim
Support for Trim (or TRIM) is usually confined to SSDs using NVMe rather than SATA. Although it’s possible to enable Trim for all external storage using the trimforce command, that remains controversial, and you should normally verify that your external SSD does Trim correctly when mounted.
Use Mints to verify whether your external drive does get trimmed correctly when it’s mounted, using its Disk Mount feature. In essence, what you do is:
Eject and disconnect the external drive.
Connect the drive at a known time, according to the Mac’s clock.
Leave the Mac alone until all that disk’s volumes have been mounted.
20 seconds after connecting the drive, or 10 seconds after the last of its volumes has mounted, open the Mints app.
Click on the Disk Mount button, and set the time in its log window to the time at which you connected the drive.
Set the period to a minimum of 20 seconds, long enough to cover the period up to 10 seconds after the last volume mounted.
Uncheck all the category checkboxes except the first, APFS +.
Click the Get log button.
When log entries are displayed, scroll to the end and look back for APFS trim entries.
Those entries are characteristically of the form
23-03-25 19:01:06.930 apfs spaceman_scan_free_blocks:3311: disk5 scan took 0.030901 s (no trims)
23-03-25 19:01:10.960 apfs spaceman_scan_free_blocks:3293: disk5 scan took 4.030544 s, trims took 3.944665 s
23-03-25 19:01:10.960 apfs spaceman_scan_free_blocks:3295: disk5 471965989 blocks free in 9131 extents
23-03-25 19:01:10.960 apfs spaceman_scan_free_blocks:3303: disk5 471965989 blocks trimmed in 9131 extents (432 us/trim, 2314 trims/s)
23-03-25 19:01:10.960 apfs spaceman_scan_free_blocks:3306: disk5 trim distribution 1:1461 2+:1267 4+:4121 16+:785 64+:822 256+:675
Check that the named disk, here disk5, is the SSD or APFS container on the SSD that you’re checking. If it has entries reporting that blocks have been trimmed, this confirms that the SSD has been trimmed as expected. Disks that don’t trim normally only show the first of that series, ending in the words no trims.
Verifying performance
SSDs use cunning tricks to accelerate their performance, including the use of SLC Write cache. That uses a portion of free storage blocks as a high-speed cache to accomplish very fast writes. As it has a limited capacity, once that cache is full further writes are performed more slowly, sometimes at dismally low speeds. SSDs also heat up during writing, and may become sufficiently hot that the SSD’s firmware throttles their write speed to control their temperature.
Few disk benchmarking apps for the Mac allow you to discover whether either SLC Write caching or thermal throttling could affect their performance during normal use. For this reason and others, while testing your new SSD using a popular app such as AmorphousDiskMark can be useful, I developed my own utility Stibium to deliver the results of real-world tests. This comes with a detailed Help book explaining the tests it can do, and what I consider to be a ‘gold standard’.
These days, I seldom restart the Mac between write and read tests, although I always run a minimum of 10 repetitions of the write tests, to ensure that the total amount of data written exceeds that likely to be encountered in real life, thus detecting any potential problems with the SLC Write cache or thermal throttling. If the drive is intended to be used with more sustained writes, then you may prefer to increase the number of repetitions to 20.
Finally, if you intend to boot your Mac from the external drive, wipe the contents of its Stibium test folder, install macOS on it, and check that your Mac can start up from it in a reasonable time.
The next time you read one of my reviews in MacFormat or MacLife magazines, you know how thoroughly each drive has been tested.
Happy testing!


