How Time Machine backs up iCloud Drive in Sonoma

macOS Sonoma brought major internal changes to iCloud Drive, and coupled with the opacity of Time Machine, you may now be wondering whether it still backs up what you have stored in iCloud Drive, and if so, where to find those backups. This article explains how this now works, and where those backups can be found.
What does Time Machine back up?
By default, Time Machine backs up almost everything on volumes it’s set to back up. It doesn’t, of course, try to back anything up from the Signed System Volume (SSV) containing macOS itself, and there are a few folders it automatically excludes, such as the hidden folder at the root of each volume containing the versions database (as that can’t be restored in any case). But unless you add iCloud Drive to its exclusion list from your Home Library folder, Time Machine will back up all the files and folders in iCloud Drive as long as they’re stored locally at the time it makes that backup.
Dataless files
It’s that last condition that’s the most important consideration. If your Mac has Optimise Mac Storage turned off, then iCloud Drive is run as a Replicating FileProvider, where everything stored in iCloud Drive is also stored locally. In that case, all those items will be backed up by Time Machine just as they would be if kept in purely local storage.
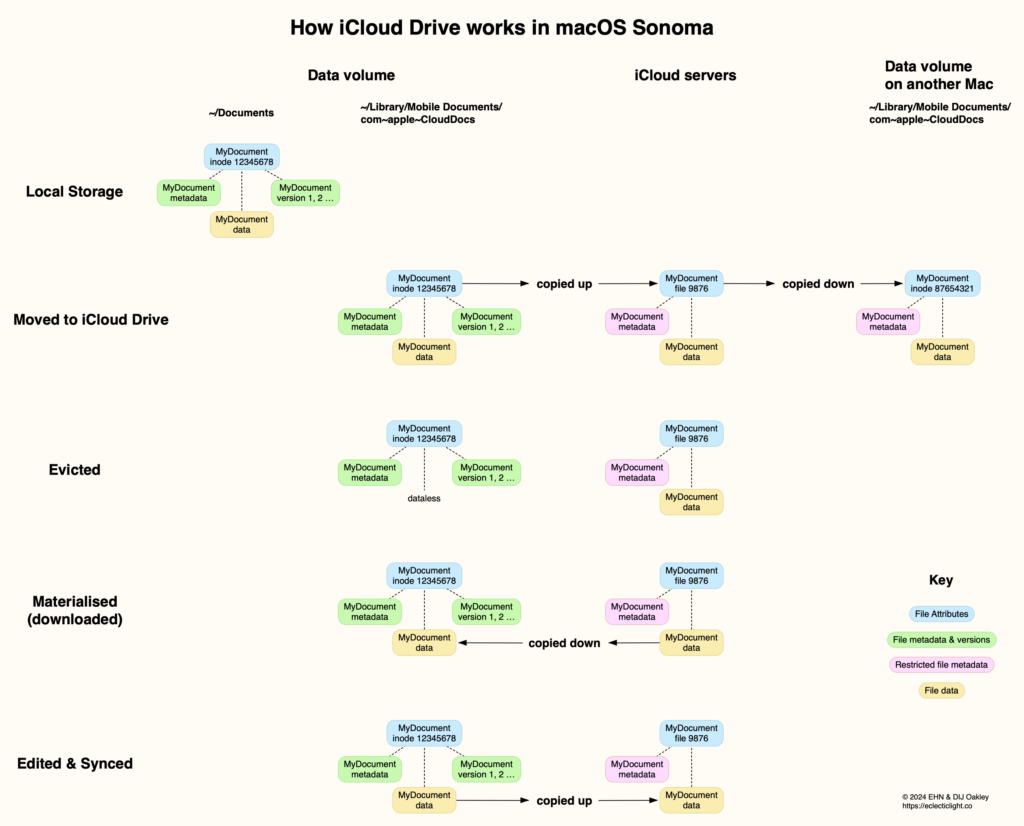
If Optimise Mac Storage is turned on, iCloud Drive behaves as a Non-Replicating FileProvider, and some or many of the files you store in iCloud Drive may be evicted from local storage, and are then no longer available for backup. This is explained in the diagram.
Files in local storage consist of attributes, metadata (extended attributes) and data. Move them to iCloud Drive and their data is then copied up to iCloud. When a file is evicted to save local storage space, the local file’s data is removed, making that copy of the file dataless. In previous versions of macOS, that was accomplished using a special stub file, but in Sonoma it simply loses its data, and the distinctive iCloud icon is displayed next to the file in the Finder.
Dataless files can’t be backed up by Time Machine, as without their data there’s nothing to back up. If you want that file to be backed up, then it has to be downloaded or materialised by downloading its data from iCloud. Some third-party backup utilities can manage that automatically for you, but Time Machine doesn’t. If you want to ensure that a file in iCloud Drive is backed up when Optimise Mac Storage is turned on you’ll thus have to download it manually if it has been evicted to iCloud.
Restoring from backup
The simplest way to restore a file or folder in iCloud Drive from a Time Machine backup is through the Time Machine app. Before opening that app, select iCloud Drive in the sidebar of the front Finder window, then the app will take you back through its backups of iCloud Drive.
The main drawback of that is that items you restore will replace any existing items. You may also prefer to use the Finder’s or a command line interface to your backups, both of which allow you to copy restored items where you prefer. The difficulty here is that macOS deliberately hides the path to iCloud Drive: in your active Home folder, they’re located in ~/Library/iCloud Drive, but that path doesn’t work in Time Machine backups.
To access them in a backup, follow the Finder path
[backupname]/[backup].backup/Data/Users/[username]/Library/Mobile Documents/com~apple~CloudDocs/
From Terminal, you’ll have more of a struggle, but need to look for
/Volumes/.timemachine/[UUID]/[backup].backup/[backup].backup/Data/Users/[username]/Library/Mobile Documents/com~apple~CloudDocs/
where the path component [backup].backup is repeated. If you locate an item first in the Finder, you can always drag and drop that into the command line for it to automatically paste the correct path.
Summary
Unless you manually exclude iCloud Drive from Time Machine backups, the contents of iCloud Drive will be backed up provided that items haven’t been evicted from local storage.
If Optimise Mac Storage is turned off, the whole of iCloud Drive will be backed up by Time Machine, as eviction doesn’t occur.
If Optimise Mac Storage is turned on, only those files and folders that are stored locally will be backed up by Time Machine. To ensure an item is backed up, manually download it before the backup is made.
Restoring iCloud Drive items from a backup is simplest in the Time Machine app, but also available in the Finder, from a path equivalent to ~/Library/Mobile Documents/com~apple~CloudDocs/ in that backup.


