Build a VM with iCloud access in Sequoia, on Apple silicon
macOS 15.0 Sequoia brings several new features for lightweight virtualisation on Apple silicon Macs, including most importantly support for iCloud at last. This article explains how to build a macOS VM on an Apple silicon Mac that can access iCloud and iCloud Drive, and its quirks and limitations.
Why so late?
Whether support for Apple Account (formerly Apple ID) had been intended for macOS lightweight virtualisation, isn’t known. However, it wasn’t until after its release, when many users asked for it, that Apple appears to have started work to implement support. Because those secrets are normally protected by the Secure Enclave, a mechanism had to be found to provide access to those from within the VM, using an exclave. That wasn’t ready to include in virtualisation for Sonoma, therefore was only released in Sequoia 15.0 on 16 September.
How to build a macOS VM with Apple Account support
For this to work, there are two essential requirements:
The host is running macOS 15.0. That can be the result of upgrading an older version of macOS.
The VM is built from an IPSW image file for macOS 15.0. It cannot work on a VM that has been upgraded to 15.0 from an older version of macOS.
It’s possible to build a VM running 15.0 on a recent version of Sonoma, but that can’t support Apple Account. It may be possible to build a VM running 15.1 beta on a 15.0 or 15.1 beta host; however, that hasn’t worked reliably on hosts running 15.1 beta. For best results, use the release 15.0 on a release 15.0 host.
Building the VM is performed normally. In Viable, set the size of the Virtual Disk and the remainder of the settings to those you want for the VM when you start it. Then click the Install… button, select the 15.0 IPSW file, then save the VM using the name and location that you want. I normally do this using a duplicate of the IPSW file, so the original remains in place. Being an APFS clone, it takes no real disk space to do that.
Once installation has succeeded, check the settings again ready for the VM’s first run, then click on Start VM… button and select the VM you just made. You will be taken through its personalisation and configuration in the normal way. Ensure that you there enter your Apple Account name, then its password.
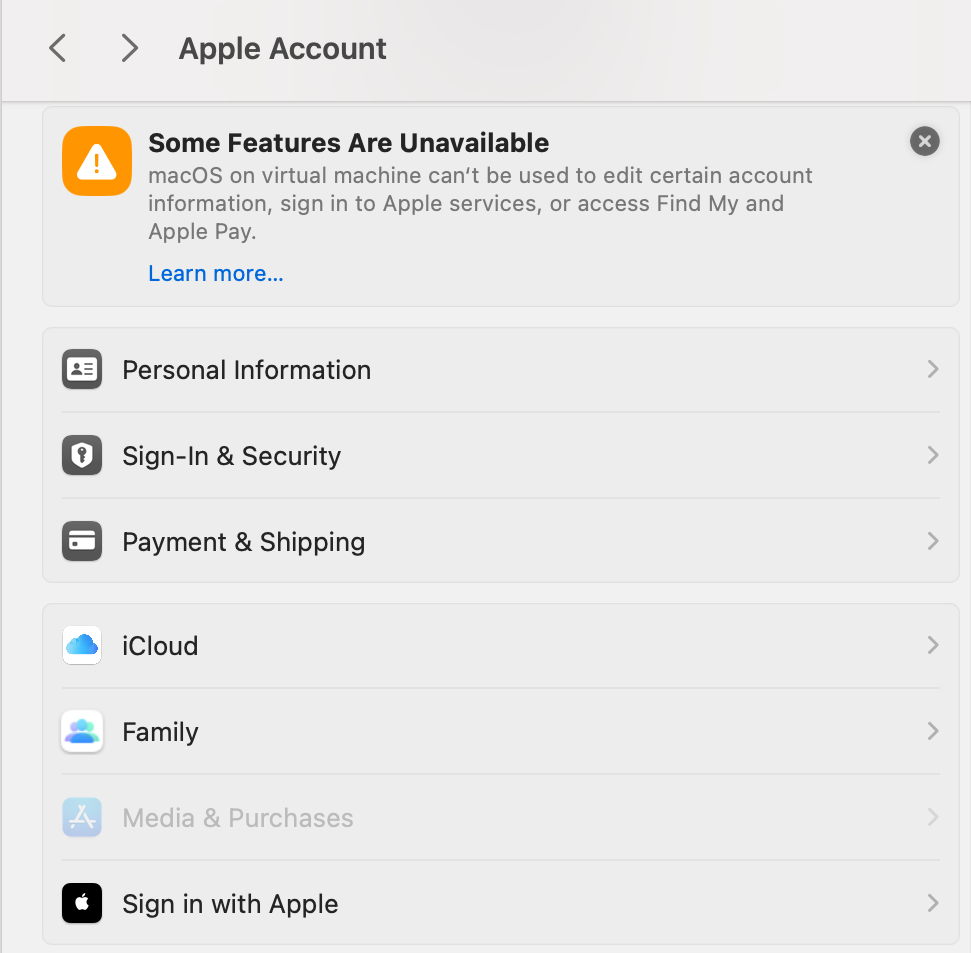
At the end of that process, you should see this summary, including FileVault enabled if that’s the host configuration. The VM will then open, and sync with iCloud Drive. If you take a look in Privacy & Security settings, you’ll see that FileVault is disabled. If you try to enable it, whether you opt for iCloud recovery or a Recovery Key, you’ll see that it can’t be turned on there.
Apple Account settings warn you that “some features are unavailable”, most obviously the Media & Purchases item, which is greyed out.
However, many iCloud features are active, including Passwords and iCloud Drive.
The official list of unsupported features reads:
Apple Media Services, most importantly the App Store. Apart from some of Apple’s free apps like Pages, Numbers and Keynote, no App Store apps will run in a VM. Still.
iCloud Mail.
Apple Wallet.
Find My.
Apple also includes iCloud Backup, although as far as I’m aware, that still isn’t a feature of macOS.
Installing XProtect data
One of my first tasks with a fresh VM is to bring it up to date with security data updates, and that’s now more complicated. I copy SilentKnight across from the host, then run it in the VM.
This is typical of a fresh Sequoia system, with the version of XProtect shown as 0, indicating that XProtect has no installed data. In this case, an update isn’t offered in SilentKnight, so I open Terminal and type in
sudo xprotect update
The response here indicates that Software Update had already downloaded and installed the XProtect bundle, but it hadn’t been installed into the new XProtect and activated, which was accomplished by that command.
With all greens, apart from FileVault, that VM is now ready for use.
One final tip: I often use VMs to test what’s potentially destructive or damaging to them. To save me from having to build each individually, I set one up, with all the apps I need, then shut it down. When I want to use that as a disposable VM, I simply duplicate it and run the copy, leaving the original unharmed. Because duplication is performed as much as possible by APFS cloning, this is really quite economical on disk space.