Thunderbolt ports aren’t all the same

USB-C ports that support Thunderbolt 3 differ between models, and those on the same Mac may not all be the same. This article explains what each can and can’t do.
USB4 support
USB-C+Thunderbolt 3 ports on Intel Macs are run by Intel chips that don’t support USB4 connections, while those on all Apple silicon Macs rely on Apple’s own hardware inside the M-series chip, and have full USB4 support. Connect most USB4 SSDs to an Apple silicon Mac and they’re significantly faster than Thunderbolt 3, but move the same drive to an Intel Mac and it will perform at less than a third of that speed. That’s because they then fall back to USB 3.2 Gen 2 speed of around 1 GB/s. The only way around that may be to use a dock, but that’s an expensive solution.
Shared transfer speeds
Intel chips in Intel Macs have one controller for each pair of USB-C+Thunderbolt 3 ports, so you shouldn’t expect full Thunderbolt 3 performance on both ports simultaneously. Apple silicon Macs do have one controller for each port, and should be capable of handling all their ports at full speed throughout, without any interactions between them.
DFU mode
On each Intel Mac with a T2 chip, or Apple silicon Mac, one of its USB-C+Thunderbolt 3 ports is designated for use in DFU mode. That port isn’t labelled, and System Information doesn’t tell you which is the DFU port on that Mac. Instead, Apple lists them for each model here. Beware when reading that support article, as it isn’t internally consistent: for instance, it shows the DFU port as being that on the left of the left side of a MacBook Pro, but states in the text that on a MacBook Pro 14-inch 2024 with an M4 chip, the DFU port is that on the right of the left side instead.
DFU mode is seldom required in T2 or Apple silicon Macs, as it’s how you can refresh or restore the firmware in them. But if you do need to use it, you’ll need to connect a USB-C (not Thunderbolt) cable to the DFU port and perform the procedure from another Mac connected to the other end. However, there is another more common situation in which you need to know the DFU port on an Apple silicon Mac: that’s when you want to create an external bootable disk.
Creating external bootable disks
Using an Intel Mac with a T2 chip to create an external bootable disk is straightforward and should work fine whichever port you use. All you need to remember is to open Startup Security Utility in Recovery mode and allow that Mac to start up from external disks.
Doing the same using an Apple silicon Mac should be simpler, as you don’t change anything in Startup Security Utility, because Apple silicon Macs can always boot securely from external drives. However, since this first became possible about four years ago, the procedure has become notoriously unreliable. Some users have never had failures, while others have never been successful. The reason for this has been obscure until recently, when Apple revealed its cause is the DFU port.
If the external drive you’re trying to install macOS onto is connected to that Apple silicon Mac’s DFU port, then the procedure is almost certainly doomed to fail. The solution is to connect that external drive to a different port, where it’s likely to succeed. Once that bootable disk has been created, personalised and set up, it will then boot and work fine from any port on that Mac, including its DFU port. I’ll be stepping through this procedure in detail in the next day or two, as there are some additional considerations.
Which is the DFU port?
Although many Macs have Thunderbolt symbols marked on the case adjacent to its USB-C+Thunderbolt 3 ports, I don’t know of any that distinguishes the DFU port similarly. The only reference detailing them is this support article. Look in System Information, and you’ll not see any mention of the DFU port, and it’s hard to work out which port is which anyway.
I may have found a useful clue, though, and would appreciate it if those with Apple silicon Macs could check this against the information given in the support article.
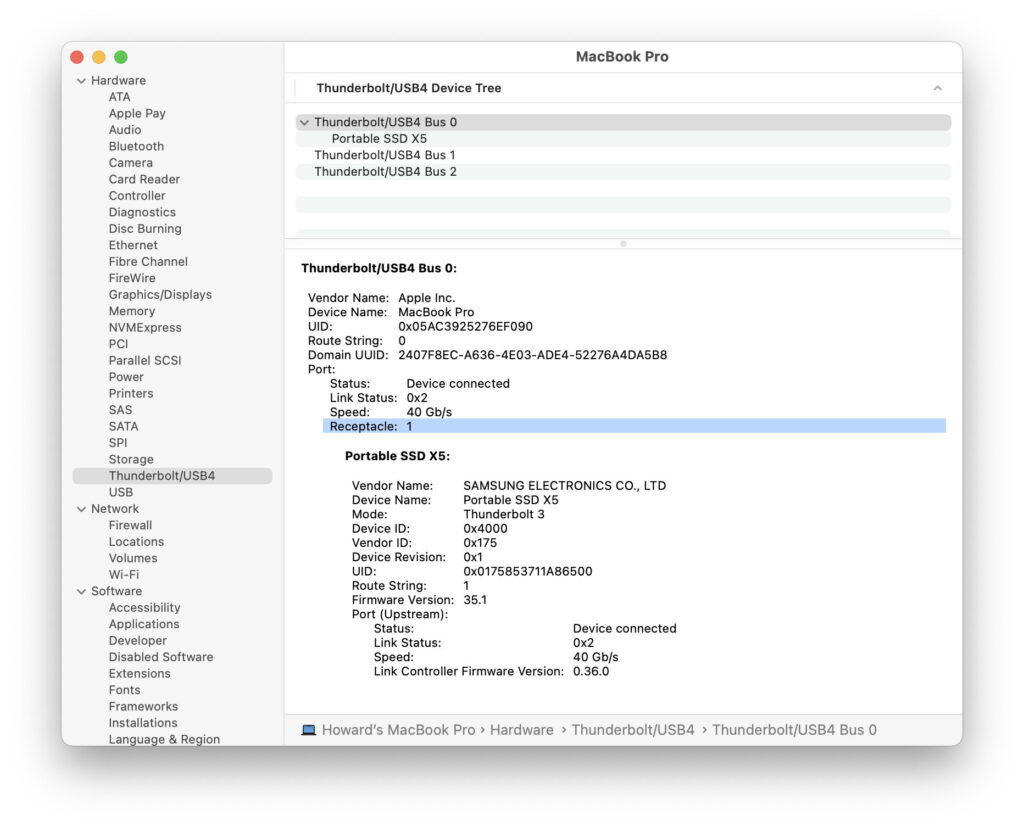
To start with, connect a USB4 or Thunderbolt drive to each of your Mac’s USB-C+Thunderbolt 3 ports, all at once or in turn. Open System Information and select Thunderbolt/USB4 at the left. That lists all the available Thunderbolt/USB4 buses, starting from Bus 0. Using the information about what’s connected to it, identify which physical port corresponds to Bus 0, which will also be listed as Receptacle 1. That should be the Mac’s DFU port.
Even if that’s correct, it would be so much more helpful if System Information were to clearly identify which is the DFU port.
Summary
USB-C+Thunderbolt 3 ports can:
support USB4 (Apple silicon) or not (Intel),
have two ports per controller (Intel) or one (Apple silicon),
support DFU mode (one per T2 or Apple silicon Mac),
create external bootable disks on Apple silicon (non-DFU port) or not (DFU port).
There are also USB-C ports that don’t support Thunderbolt or USB4, for example on the front of the Mac mini M4 and some Mac Studio models.


