How external bootable disks work with Apple silicon Macs
Unlike Intel Macs (including those with T2 chips), all Apple silicon Macs always start their boot process from their internal SSD, even when they are set to start up from a bootable external disk. This ensures the security and integrity of that process and prevents an attacker from starting that Mac up without credentials. This article explains how this affects the use of Apple silicon Macs.
Bootable external disks
In addition to normal requirements for a macOS installation on an external disk to be able to boot a Mac, ownership of the boot volume group on that disk is required. This is normally performed when installing macOS on that disk, as explained here, and results in the ownership of that boot volume group by an authorised user of that Mac. This is incorporated into a LocalPolicy that is saved to the internal SSD of that Mac.
If that ownership and LocalPolicy haven’t been created at the time of installation, macOS should prompt for their creation when you select that external disk as a startup disk, in System Settings or Recovery mode. That enables an existing external disk to be made bootable for another Mac. If that fails, then macOS will refuse to start up from that external disk.
Disk structure
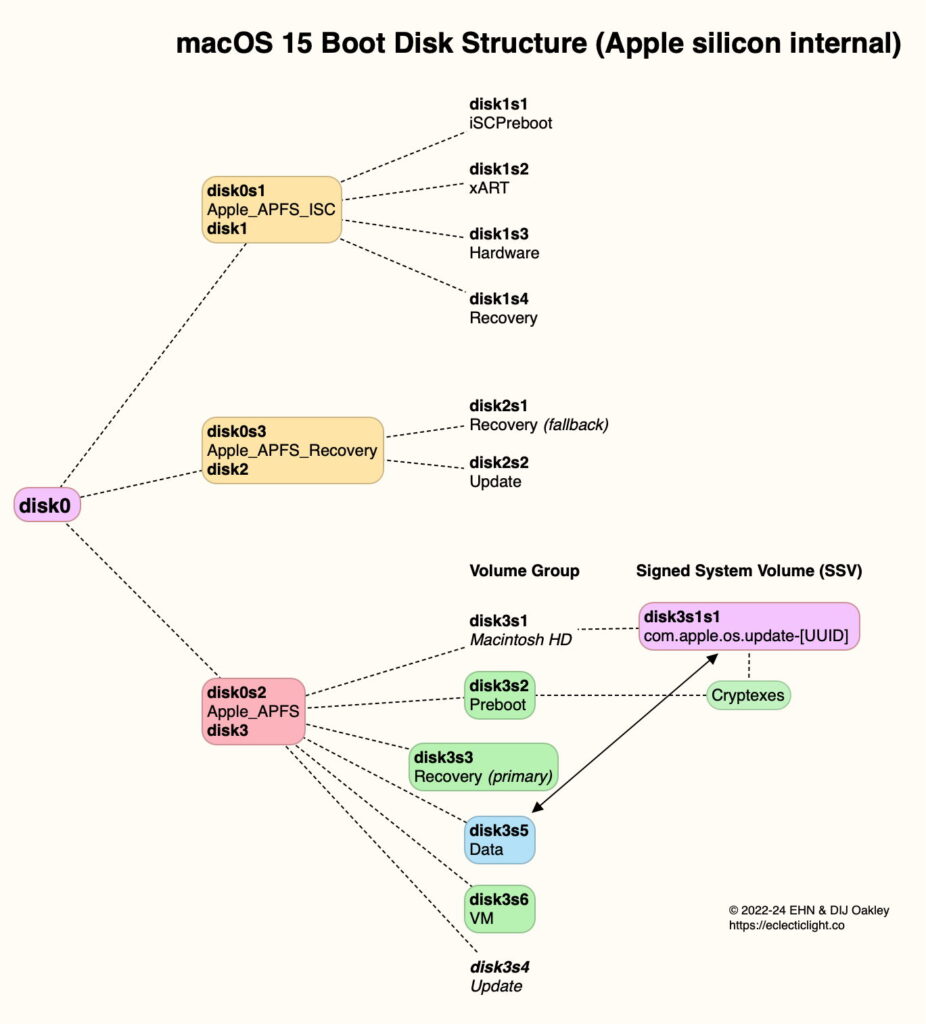
To accommodate the more advanced Secure Boot of Apple silicon Macs, their internal SSDs are divided into three partitions, with an extra six volumes beyond the boot volume group.
The boot volume group itself is composed of:
The System volume, used to build the SSV, which is unmounted during normal running.
The Signed System Volume, SSV, a signed and sealed snapshot of the System volume, containing the immutable System.
The Data volume, by default named Data, mounted within the System directory tree, and writable by the user.
The small Preboot volume, used to store cryptexes.
The paired Recovery volume, containing a disk image of the Recovery system.
The VM volume as the backing store for virtual memory.
Possibly an Update volume that appears to have been used when upgrading to versions of Big Sur. This won’t be present on more recent Macs, and appears to have been disused since macOS 11.
The SSV is created from the System volume during macOS installation and update, and features a tree of cryptographic hashes verifying its integrity, and its signature to verify that its contents match those expected for that version of macOS.
Boot process
On Apple silicon Macs, this starts with the Boot ROM to validate the Low Level Bootloader (LLB), stage 1 of the boot process. The LLB in turn validates other firmware to be used in Stage 2, the LocalPolicy to be applied to the startup disk, and iBoot (Stage 2) itself, in accordance with the requirements of the applicable LocalPolicy. When starting up from a boot volume on an external disk, control is then transferred to that bootable system, which is stored in a single APFS container with the same layout as that for an Intel Mac.
Thus, when starting up from an external disk, M-series Macs require LLB and iBoot together with LocalPolicy all stored on the internal SSD. As LLB and iBoot are part of a macOS install, the best way to provide those is in a full installation of the current release of macOS.
LocalPolicy
The user controls LocalPolicy through Startup Security Utility, which is only accessible in Recovery Mode, and requires user authentication. There’s no LocalPolicy that applies to all users and all disks, though: each LocalPolicy is specific to a boot volume group and authorised user. For example, these can allow:
a single bootable external disk to be used to start up two or more Macs;
one Mac to be started up from any of several boot volume groups, which can be running older versions of macOS, or could load third-party kernel extensions.
Default LocalPolicy created for each bootable external disk provides Full Security, which among other things blocks the loading of third-party kernel extensions and requires SIP to be fully enabled. iBoot (Stage 2) validates kernel collections, signed System volumes, and other components to ensure their integrity, and that the kernel, extensions and macOS to be loaded have an acceptable version number.
LocalPolicy can be changed, in particular by changing Secure Boot settings using Startup Security Utility, first booting from that boot volume group, shutting down, and starting up in Recovery mode. That sequence ensures that the Mac boots into the Recovery volume paired with the System volume whose security settings are to be changed.
Fallback
The current startup disk setting is stored in NVRAM, which on Apple silicon Macs can’t readily be reset by the user. In the event that disk can’t be used to boot that Mac, it will normally fall back to starting up from the internal SSD. This is a more convoluted process in the event that the expected startup disk can’t be found at all: in that case, there may be a long delay in startup, during which the power light will remain on but the display remains black. Eventually, when all hope of finding the missing boot disk is abandoned, the Mac may boot from the hidden Recovery container on the internal SSD, normally used as Fallback Recovery, enabling the user to choose another startup disk and restart from that.
External boot volume groups
The boot volume group on external storage has the same structure and features as that in the Apple_APFS container of the internal SSD, and once it has started up is self-sufficient. macOS is contained in its SSV, with cryptexes saved to its Preboot volume. Writeable system data, and all user data, are saved to its Data volume, and it has its own paired Recovery volume, used when the external system is booted into Recovery mode.
Its macOS is updated independently of that installed on the internal SSD, although any firmware updates to be installed as part of a macOS update change the firmware on the internal SSD, as there’s no firmware on the external SSD. In the event that internal and external macOS versions differ, the installer or updater will only ever update the firmware to the more recent version.
DFU mode
Apple silicon Macs are the first Apple computers whose firmware can be both upgraded and downgraded by installation of an IPSW image file when the Mac is in DFU mode. This enables you to erase the whole of the internal SSD and install all three containers, with firmware, the SSV and Data volumes to factory-fresh condition, for any supported version of macOS. This is invaluable when there’s a problem with firmware, corruption of the internal SSD without physical damage, or simply to revert to an older macOS.
Because restoring in DFU mode erases the whole of the internal SSD, it also blows away all saved LocalPolicy for that Mac. Following the restore process, any bootable external disk used with that Mac will need to have its ownership re-established so that a new LocalPolicy can be created for it.
Key points
To be bootable from an Apple silicon Mac, an external disk needs ownership of its boot volume group, and LocalPolicy for it.
Ownership is normally assigned and LocalPolicy created during macOS installation.
Ownership and LocalPolicy can also be created when selecting an external disk as the startup disk. That allows an external disk to be bootable with more than one Apple silicon Mac.
A complete macOS boot volume group is still required on the internal SSD to be able to boot from external disks, as the early stages of the boot process, including validation of its LocalPolicy, can only be run from the internal SSD.
LocalPolicy can be changed using Startup Security Utility in the paired Recovery volume.
Fallback policy ensures that a Mac can still start up if the expected external boot disk fails to boot, or is missing.
External boot volume groups are self-sufficient and don’t rely on the internal SSD once they have booted successfully.
All stored LocalPolicy is destroyed when a Mac is restored in DFU mode, and ownership and LocalPolicy then have to be recreated for any external bootable disks.