A brief history of installing Mac OS: Mac OS 9.1
Installing and updating the Mac’s operating system has probably changed more over the last 41 years than any other feature. Initially in Classic Mac OS there was little more to do than install the System and ‘bless’ that disk to make it bootable. As the System became more complex and grew various extensions this required a more formal installation process, and Mac OS and its components were stored inside the System Folder. In this article, I summarise how this worked towards the end of Classic Mac OS, in version 9.1 in 2001, the same year that Mac OS X 10.0 Cheetah was released.
By this time, Mac OS was distributed on CD-ROM rather than a stack of floppy disks, and it was quite usual to install only selected parts of it. Installation was considerably easier if you had more than one volume available on your Mac’s hard disk, as that allowed you to run from one volume while installing or updating into another. As those were HFS+ volumes, they were fixed-size partitions of the disk, corresponding to containers in APFS.
ROM updates were provided separately, and you had to check Apple’s support site to discover whether your Mac required an update. If it did, then that had to be performed as a separate step before upgrading Mac OS.
Another vital task before installing or upgrading Mac OS was to run the new version of Disk First Aid provided on the CD-ROM to check and repair disks. Minor errors were common, but if left they could bring disaster, leaving one or more volumes completely broken.
Once all mounted volumes had been checked and repaired using Disk First Aid, you opened the Drive Setup utility provided on the installer CD-ROM. Although the Mac OS installer would by default update any disk drivers it could, it was best to do this manually first, then restart the Mac, so those updated drivers could be used during installation.
Classic Mac OS installer apps relied on proprietary compressed archives called tomes containing the software to be installed. A full installation of Mac OS 9.1 consisted of multiple tomes for each of its components including the main system, Internet access, ColorSync, and so on.
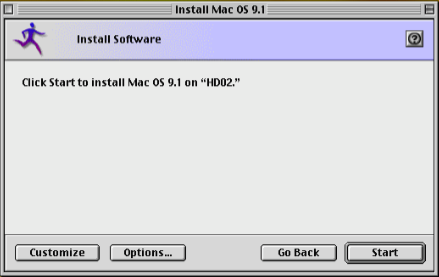
Once restarted you then ran the installer, which was largely self-explanatory. If you were updating a volume that already had Mac OS on it, you could opt to perform a clean install by selecting this as one of the install options. There was also a freeware Clean Install Assistant to help move over old System Folder contents easily.
Although recent installers had improved considerably, most normally opted for a ‘custom’ installation by clicking on the Customise button, rather than just accepting that recommended.
That enabled you to browse through the components to be installed, and to ensure that nothing important to you was missed out. If you didn’t get those right first time, you could always run the installer later to add the bits you forgot.
It was also common practice to check what was in the Recommended Installation for each component. There were a great many components in the main Mac OS 9.1 install item, some of which were seldom wanted. You needed to take your time and browse these thoroughly before pressing ahead. Once the installation had completed, you then used the Startup Disk control panel to select the volume containing Mac OS 9.1, and restarted.
Starting up from the newly installed system then opened the Mac OS Setup Assistant to configure the new system. You might then find that some drivers were missing, in this case for a Graphire pad. Many of those could be found and installed from the Internet.
The installer could also be run to install or re-install individual components of Mac OS using its Customize button.
For example, to re-install the OpenGL components from within Mac OS 9.1, you opted for a custom installation mode for the Mac OS 9.1 group, and unchecked all the other components. Because these were listed in a hierarchical series, this was fairly quick provided you were careful not to leave any checked inadvertently.
Some components, such as QuickTime, weren’t readily installed from the Mac OS Installer. If you looked through the folders on the CD-ROM could locate their installer scripts. Sometimes, double-clicking that script would start the installation process. However, particularly with Mac OS 9.1, you would probably see this error message. In that case, you’d have to perform a manual install from its file tome, using the freeware TomeViewer utility.
You dragged and dropped the installation tome file on TomeViewer, and it opened up its contents as a list like this. You could either get it to extract the entire contents of the tome, or you could select one or more files and extract them into a folder before installing them manually into the System Folder of your choice.
Once you had saved the individual components you needed, you dragged and dropped them onto your System Folder. It would automatically put them into the correct folders within – Control Panels, Extensions, etc. However, some might require to be put in sub-folders within those. If you were unsure, you could always copy the layout of a fully functional System Folder.
Installing and maintaining Mac OS 9.1 was a complex process even when you were content to follow the recommended installation, and it could easily occupy you for several hours to get it just right.

