Take control of disks using APFS
If you want a quiet life, just format each external disk in APFS (with or without encryption), and cruise along with plenty of free space on it. For those who need to do different, either getting best performance from a hard disk, or coping with less free space on an SSD, here are some tips that might help.
File system basics
A file system like APFS provides a logical structure for each disk. At the top level it’s divided into one or more partitions that in APFS also serve as containers for its volumes. Partitions are of fixed size, although you can always repartition a disk, a process that macOS will try to perform without losing any of the data in its existing partitions. That isn’t always possible, though: if your 1 TB disk already contains 750 GB, then repartitioning it into two containers of 500 GB each will inevitably lose at least 250 GB of existing data.
All APFS volumes within any given container share the same disk space, and by default each can expand to fill that. However, volumes can also have size limits imposed on them when they’re created. Those can reserve a minimum size for that volume, or limit it to a maximum quota size.
How that logical structure is implemented in terms of physical disk space depends on the storage medium used.
Faster hard disks
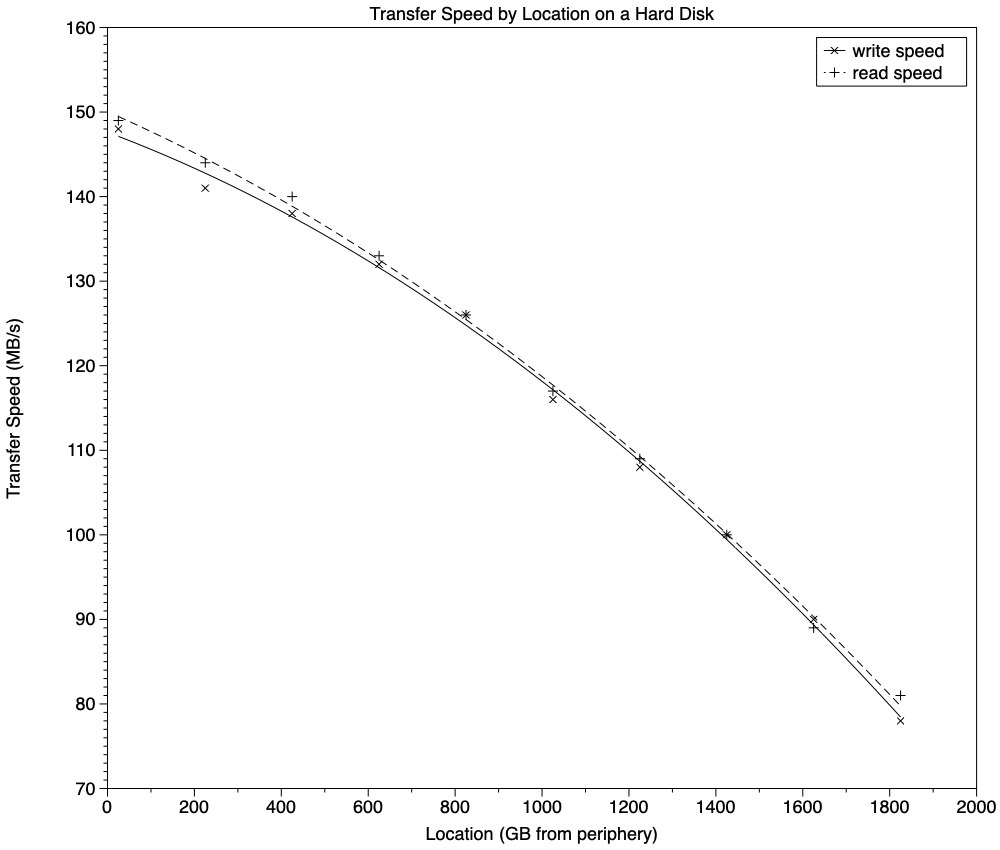
Hard disks store data in circular tracks of magnetic material. To store each file requires multiple sectors of those tracks, each of which can contain 512 or 4096 bytes. As the length (circumference) of the tracks is greater as you move away from the centre of the platter towards its edge, but the disk spins at a constant number of revolutions per minute (its angular velocity is constant), it takes a shorter time for sectors at the periphery of the disk to pass under the heads than for those closer to the centre of the platter. The result is that read and write performance also varies according to where files are stored on the disk: they’re faster the further they are from the centre.
This graph shows how read and write speeds change in a typical compact external 2 TB hard disk as data is stored towards the centre of the disk. At the left, the outer third of the disk delivers in excess of 130 MB/s, while the inner third at the right delivers less than 100 MB/s.
You can use this to your advantage. Although you don’t control exactly where file data is stored on a hard disk, you can influence that. Disks normally fill with data from the periphery inwards, so files written first to an otherwise empty disk will normally be written and read faster.
You can help that on a more permanent basis by dividing the disk into two or more partitions (APFS containers), as the first will normally be allocated space on the disk nearest the periphery, so read and write faster than later partitions added nearer the centre. Adding a second container or partition of 20% of the total capacity of the disk won’t cost you much space, but it will ensure that performance doesn’t drop off to little more than half that achieved in the most peripheral 10%.
Reserving free space on SSDs
The firmware in SSDs knows nothing of its logical structure, and for key features manages the whole storage as a single unit. Wear levelling ensures that individual blocks of memory have similar numbers of erase-write cycles, so they age evenly. Consumer SSDs that use dynamic SLC write caches allocate those from across the whole storage, and aren’t confined to partitions. You can thus manage free space to keep sufficient dynamic cache available at a disk level.
One approach is to partition the SSD to reserve a whole container, with its fixed size, to support the needs of the dynamic cache. An alternative is to use volume reserve and quota sizes for the same purpose, within a single container. For example, in a 1 TB SSD with a 100 GB SLC write cache you could either:
with a single volume, set its quota to 900 GB, or
add an empty volume with its reserve size set to 100 GB.
Which of these you choose comes down to personal preference, although on boot volume groups you won’t be able to set a quota for its Data volume, and the most practical solution for a boot disk is to add an empty volume with a specified reserve size.
To do this when creating a new volume, click on the Size Options… button and set the quota or reserve.
Summary
Partition hard disks so that you only use the fastest 80% or so of the disk.
To reserve space in an SSD for dynamic caching, you can add a second APFS container.
A simpler and more flexible way to reserve space on SSDs is setting a quota size for a single volume, or adding an empty volume with a reserve size.
Size options can currently only be set when creating a volume.


