When you should use Safe Mode, and what it does
Safe mode is an undervalued tool for dealing with a broad range of problems in macOS. Although not a universal panacea, it has several valuable uses, and can be helpful before having to resort to more time-consuming diagnostic procedures. This article explains how to engage your Mac into Safe mode, what it does, and when you should use it. This is based primarily on macOS Sequoia 15.3.2 running on Apple silicon Macs, but does cover Intel models, and much should apply to recent versions of macOS.
Entering Safe mode
Consider first whether you should disconnect some or all non-essential peripherals. If you’re only intending to use Safe mode to flush caches, or to install an awkward macOS update, that shouldn’t be necessary. When trying to diagnose potential problems with extensions, though, it could be beneficial.
Apple silicon Mac
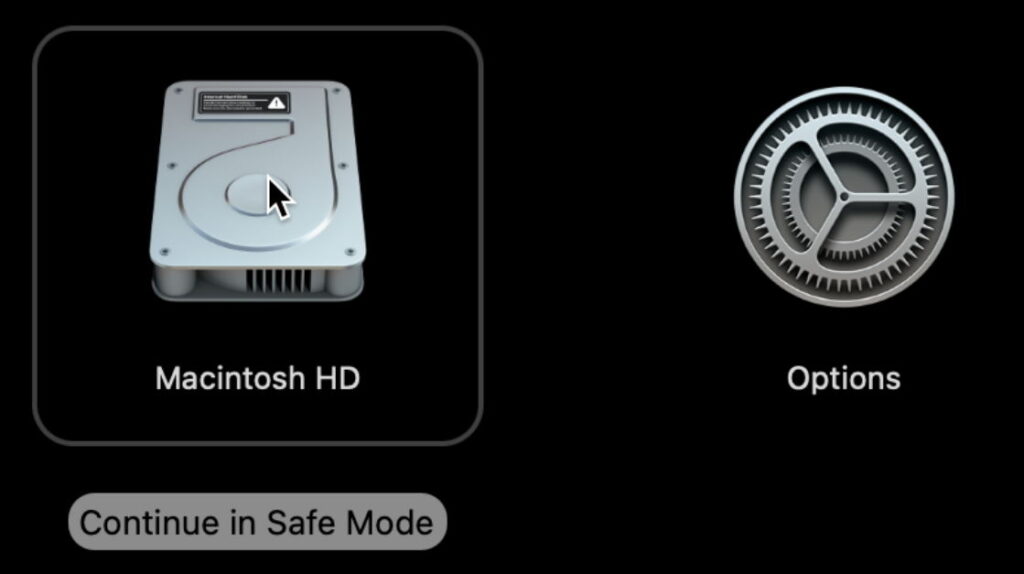
The Mac must be shut down to begin with. Press its Power button and keep it held in until you see its Recovery options loading. Then select the startup disk you want your Mac to boot from, and hold the Shift key. The button underneath that disk icon will change to read Continue in Safe Mode. Click on that button, and your Mac will restart.
Normally, you’ll be asked to log in twice, and initially, at the upper right of the display, the words Safe Boot will be shown in red.
Intel Mac
All you need do with an Intel Mac is start up (or restart) with the Shift key held down until you see the login window. If you have set a firmware password, you’ll need to remove that in Recovery before trying to start up in Safe mode.
Checking
Once your Mac is running in Safe mode and you’ve logged in, check that it really is in Safe mode by opening System Information. Click on Software at the left, and the line Boot Mode should say Safe rather than Normal.
If you can’t start your Mac up successfully in Safe mode, Recovery is your only option, where you might consider reinstalling macOS.
Leaving Safe mode
To leave Safe mode and return to normal mode, simply restart the Mac.
How is it different?
According to Apple’s current description, Safe mode:
“Prevents certain software from loading as your Mac starts up. This includes login items and extensions that aren’t required by macOS, and fonts that weren’t installed by macOS.”
“Performs a basic check of your startup disk, similar to the more comprehensive check performed by the First Aid feature of Disk Utility.”
“Clears some system caches, including font caches and the kernel cache. These are automatically created again as needed.”
Apple warns that some macOS features may not work when in Safe mode. Those could affect “video capture, graphics performance, file sharing, Wi-Fi, accessibility, audio devices and devices connected via USB, Thunderbolt or FireWire.” In practice these seem to vary according to Mac and macOS, making it hard to know what to expect. Most USB and Thunderbolt storage should still work normally, and Time Machine backups should continue as usual when running in Safe mode.
Blocking extensions and customisations
Booting in Safe mode blocks the loading of all third-party kernel extensions, and may delay the loading of some of those provided in macOS. Specifically, those in the Auxiliary Kernel Collection (AKC) aren’t loaded, and any devices or features relying on them won’t be available. All kernel extensions in the main Kernel Collection appear to be loaded normally. If you suspect that your Mac’s problems could relate to a third-party kernel extension, this makes Safe mode an excellent diagnostic test without having to alter Startup Security for an Apple silicon Mac.
Apple adds to that login items, system extensions (the modern replacement for kernel extensions), and fonts not installed by macOS. These are other common causes of compatibility problems, adding to the value of Safe mode.
Checking the startup disk
Older versions of macOS performed extensive checks of both disks and snapshots using fsck_apfs. Apple discontinued those some years ago, because they extended Safe boot time to periods sometimes exceeding half an hour. Since then, checks performed by fsck_apfs don’t include snapshots, and are quick checks rather than a full check-and-repair. As they’re performed after the Data volume in the active boot volume group has been mounted, they only cover a limited range of volumes: from the active boot volume group, only the Recovery and Update volumes are checked, together with all accessible external volumes. Results are written to the fsck_apfs logs at /var/log/fsck_apfs.log and /var/log/fsck_apfs_error.log, and in entries in the Unified log.
Those checks in Safe mode currently appear identical to those made during a normal boot. Accordingly, if you want to perform checks on your Mac’s current boot volume group, you should do so using Disk Utility or fsck_apfs in Recovery mode. Safe mode is no longer a useful tool for performing disk checks.
Deleting caches
Discovering exactly which caches are emptied or deleted isn’t straightforward. Beyond Apple’s two instances of font caches and the kernel cache (which only applies to Intel Macs), none of the caches used by Launch Services appear to be affected by this. Neither does this appear to include other notable caches and hidden data stores, such as those for QuickLook or Spotlight.
macOS updates
Although not mentioned by Apple, one longstanding use for Safe mode is to download and install macOS updates. This may have become less used since updating was re-engineered for Big Sur, but is always worth bearing in mind. A short visit to Safe mode, lasting just a couple of minutes before restarting in normal user mode, can also fix problems discovered after updating or upgrading macOS; if a normal restart doesn’t sort them out, try Safe mode before calling Apple Support.
Safe mode in Apple silicon Virtual Machines
Safe mode is available when running lightweight virtualisation of macOS on an Apple silicon Mac, provided that the host operating system is Ventura or later, which provides the option to start the VM in Recovery mode. Enable that option before starting the VM, then use the normal procedure to restart in Safe mode. When you shut down that VM, remember to disable starting in Recovery before running the next VM.
Good reasons for Safe mode
To identify and locate problems with third-party kernel extensions.
To identify and locate problems with third-party system extensions, fonts, login items, and other user customisations, as a quicker alternative to creating a ‘clean’ user account.
To download and install macOS updates, when they don’t work in normal mode.
To fix problems following macOS updates, when a normal restart doesn’t help.
To clear font and other user caches.
When there are problems preventing booting in normal mode, short of going to Recovery mode.
As a generic non-destructive panacea.