A visual sampler of window layouts in Sequoia
Recent versions of macOS have added new ways to lay out windows, including Stage Manager and most recently tiling. This collection of screenshots demonstrates the repertoire available in macOS 15 Sequoia, with brief notes to suggest how to get the best from them. Controls and options for most of these are in Desktop & Dock settings, except where given otherwise. There are also many third-party enhancements available: those are intentionally omitted for the sake of simplicity and clarity. Similarly, there are often several different controls and actions that can achieve the same effect. Only the more obvious are given here. To enlarge any of the screenshots below, click on the image.
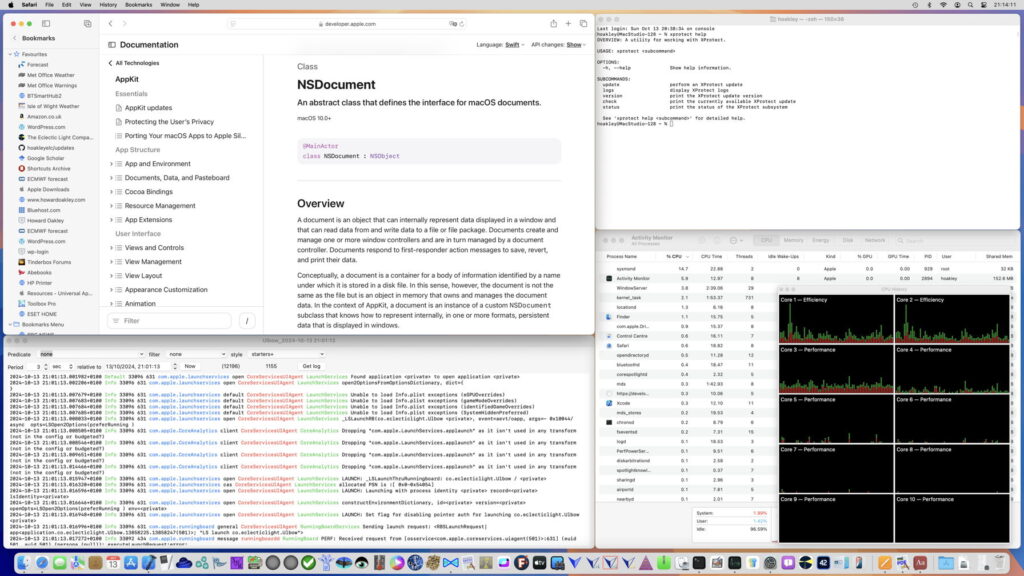
Full screen single window
This is the simplest of all, best suited to windows already containing multiple views that need full space, here with Xcode. Control whether the window is displayed with or without the menu bar in Control Centre settings, in Automatically hide and show the menu bar at its foot. Integrate this with access to the Finder and other apps by setting it in its own Space.
To put a window in full screen mode, click on its green traffic light control at its top left, or use the command in the View menu. To exit, use the same controls.
Freestyle overlapping
Probably the most traditional and popular layout, with multiple overlapping windows from different apps. Although dynamic and flexible, it’s easy to lose track of apps and windows in their multiple layers.
To find a lost window or app, enter Mission Control by pressing the F3 key, then click on the window to bring it into focus. Switch focus between apps by selecting the app in the Dock.
Use the Desktop to collect your working documents, or set it as wallpaper.
Tiled
Some apps, here BBEdit in its Find Differences feature, tile multiple views into a single window, here with linked scrollers. Sequoia provides additional tools to tile app windows so they don’t overlap. These are best suited to layouts with 2-4 windows occupying similar areas, but can be adapted for others.
Simplest are two windows arranged in a split view, either horizontally or vertically. Arrange them using the Move & Resize commands in the Window menu, from the window’s green traffic light control popup menu, or by moving the window with controls enabled in Desktop & Dock settings. Note the latter don’t work with windows dragged to the bottom edge of the screen, only the top and sides.
For those who like a clean, regular look with four open windows, tile them into quadrants with the same controls. This shows the small gaps between windows when Tiled windows have margins is enabled in Desktop & Dock settings.
Use a regular tiled layout adjusted to suit their contents better. Resizing windows manually loses the margins of the original tiling.
The alternative Full Screen Split View is quick to create. To put the currently focussed window into one half, use one of the Full Screen Tile options in the Window menu, or its green traffic light popup menu. That puts the other half of the display into Mission Control, where you select the window to place in the other half of the Split View.
Adjust the balance between the size of the two windows using the central bar. If you prefer, the split can be horizontal rather than vertical as here. To return the windows to normal, click on their green traffic light control.
On their own, tiled layouts are constraining, but when used in their own Space can be valuable.
Stage Manager
Stage Manager puts a suite of windows from one or more apps into a single active group on stage, with quick switching between different suites. Enable and control it in its section in Desktop & Dock settings. Switch between different window groups simply by clicking on them in the icon list at the left.
Management of suites is dynamic, and detailed in the following articles:
Getting started
Workflow strategies
Apps and windows
For further flexibility, use Stage Manager in one or more Spaces.
Spaces
Spaces are complete Desktop layouts you can switch between, accessed through Mission Control. To create a second Space, press F3 for Mission Control and move your pointer to the top of the display, then click on the + at the right. Options are at the very bottom of Desktop & Dock settings. Any of the above layouts can be included as a Space.
Multiviews
One remaining problem with layouts is support for multiple views of the same document. Better text editors let you split a window into two views of the same document, useful when you need to refer back while editing. Browsers will open two tabs or windows on the same page. However, very few PDF viewers let you view more than one section at once of the same PDF in multiple windows. That’s a feature of my free Podofyllin.
Apple Help
Freestyle
Full screen
Tiling
Full screen split view
Stage Manager
Spaces and Mission Control
Have fun exploring all of these.


