A brief history of FileVault
Encrypting all your data didn’t become a thing until well after the first release of Mac OS X. Even then, the system provided little support, and most of us who wanted to secure private data relied on third-party products like PGP (Pretty Good Privacy).
FileVault 1
Apple released the first version of FileVault, now normally referred to as FileVault 1 or Legacy FileVault, in Mac OS X 10.3 Panther in 2003. Initially, that only encrypted a user’s Home folder into a sparse disk image, then in 10.5 Leopard it started using sparse bundles instead. These caused problems with Time Machine backup when it too arrived in Leopard, and proved so easy to crack that in 2006 Jacob Appelbaum and Ralf-Philipp Weinmann released a tool, VileFault, to decrypt FileVault disk images.
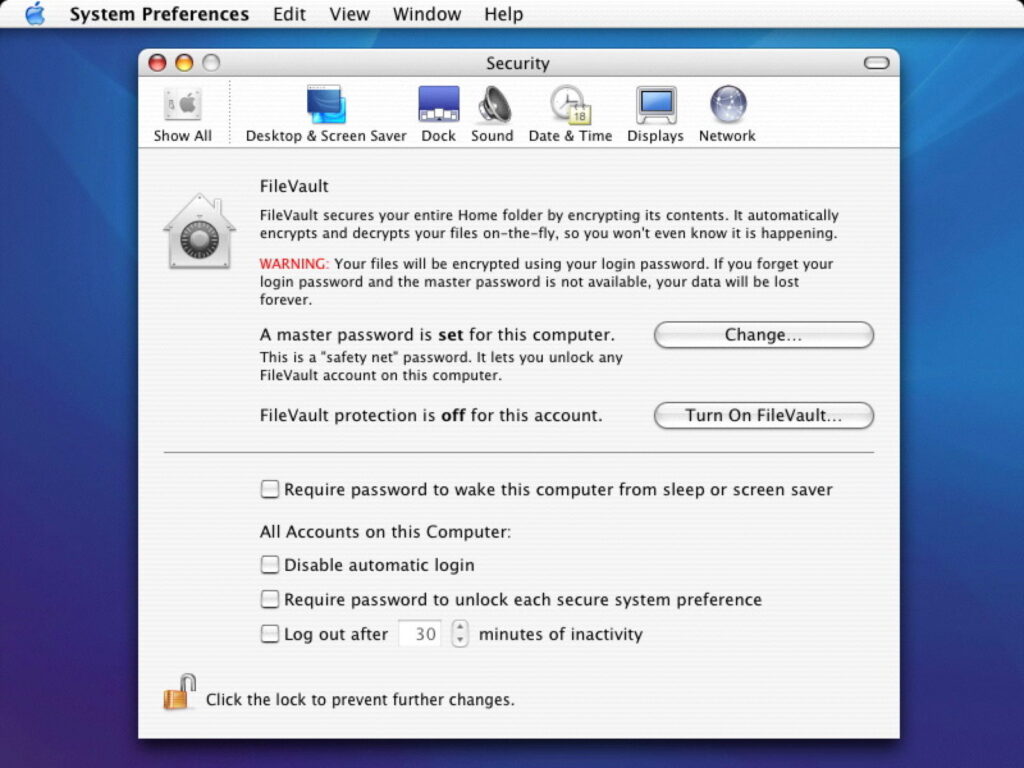
FileVault 1 was controlled in the Security pane of System Preferences, shown here in 2004.
Each new user added in the Accounts pane could have their Home folder stored in an encrypted disk image. Encryption keys were based on the user’s password, with a master password set for all accounts on the same Mac.
FileVault 2
FileVault 2 was introduced in Mac OS X 10.7 Lion in 2011, and at last provided whole-volume encryption based on the user password. Encryption was performed using the XTS-AES mode of AES with a 256-bit key, by the CPU. At that time, more recent Intel processors had instructions to make this easier and quicker, but all data written to an encrypted volume had to be encrypted before it was written to disk, and all data read from it had to be decrypted before it could be used. This imposed significant overhead of around 3%, which was more noticeable on slower storage such as hard disks, and with slower Macs.
Apple didn’t implement this by modifying the HFS+ file system to add support for encryption, but by adding encryption support to CoreStorage, the logical volume manager. In theory this would have enabled it to encrypt other file systems, but I don’t think that was ever done.
Turning FileVault on and off was quite a pain, as the whole volume had to be encrypted or decrypted in the background, a process that could take many hours or even days. Most users tried to avoid doing this too often as a result so, while FileVault 2 was secure and effective, it wasn’t as widely used as it should have been.
These screenshots step through the process of enabling FileVault in 2017.
Control was in the FileVault tab in System Preferences.
iCloud Recovery was added as an alternative to the original recovery key.
Encryption began following a restart, and then proceeded in the background for however long it took. Shrewd users enabled FileVault when a minimum had been installed to the startup volume, to minimise time taken for encryption.
With a minimal install, it was possible to complete initial encryption in less than an hour. With full systems, it could take days if you were unlucky.
Although FileVault has had a few security glitches, it has done its job well. Perhaps its greatest threat came in the early days of macOS Sierra, when Ulf Frisk developed a simple method for retrieving the FileVault password for any Mac with a Thunderbolt port. An attacker could connect a special Thunderbolt device to a sleeping or locked Mac, force a restart, then read the password off within 30 seconds. This exploited a vulnerability in the handling of DMA, and was addressed by enabling VT-d in EFI, in Sierra 10.12.2 and 10.12.4.
Hardware encryption
The next big leap forward came at the end of 2017, with the release of the first Macs with T2 chips, as intermediates on the road to Apple silicon. One of Apple’s goals in T2 and Apple Silicon chips was to make encrypted volumes the default. To achieve that, T2 and M-series chips incorporate secure enclaves and perform encryption and decryption in hardware, rather than using CPU cycles.
The Secure Enclave incorporate the storage controller for the internal SSD, so all data transferred between CPU and SSD passes through an encryption stage in the enclave. When FileVault is disabled, data on protected volumes is still encrypted using a volume encryption key (VEK), in turn protected by a hardware key and a xART key used to protect from replay attacks.
When FileVault is enabled, the same VEK is used, but it’s protected by a key encryption key (KEK), and the user password is required to unwrap that KEK, so protecting the VEK used to perform encryption/decryption. This means that the user can change their password without the volume having to be re-encrypted, and allows the use of special recovery keys in case the user password is lost or forgotten. Keys are only handled in the secure enclave.
Securely erasing an encrypted volume, also performed when ‘erasing all content and settings’, results in the secure enclave deleting its VEK and the xART key, rendering the residual volume data inaccessible even to the secure enclave itself. This ensures that there’s no need to delete or overwrite any residual data from an encrypted volume: once the volume’s encryption key has been deleted, its previous contents are immediately unrecoverable.
Coverage of boot volumes by encryption varies according to the version of macOS. Prior to macOS Catalina, where macOS has a single system volume, the whole of that is encrypted; in Catalina, both System and Data volumes are encrypted; in Big Sur and later, the Signed System Volume (SSV) isn’t encrypted, nor are Recovery volumes, but the Data volume is.
External disks
Hardware encryption and FileVault’s ingenious tricks aren’t available for external disks, but APFS was designed to incorporate software encryption from the outset. As with internal SSDs, the key used to encrypt the volume contents isn’t exposed, but accessed via a series of wrappers, enabling the use of recovery keys if the user password is lost or forgotten. This involves a KEK and VEK in a similar manner to FileVault on internal SSDs. As the file system on the volume is also encrypted, after the KEK and VEK have been unwrapped, the next task in accessing an encrypted volume is to decrypt the file system B-tree using the VEK.
Enabling FileVault has been streamlined in recent years, as shown here in System Settings last year, for an external SSD, thus not using hardware encryption.
FileVault control has moved to Privacy & Security in System Settings.
The choice of iCloud Recovery or a recovery key remains.
Because only the Data volume is now encrypted, enabling FileVault before populating the Home folder allows encryption to be almost instantaneous, on an external disk.
Virtual machines
The most recent enhancement to FileVault protection extends support to Sequoia virtual machines running on Sequoia hosts. Apple hasn’t yet explained how that one works, although I suspect the word exclave is likely to appear in the answer.
If your Mac has a T2 or Apple silicon chip and you haven’t enabled FileVault, then you’re missing one of the Mac’s best features.