Create an external bootable disk for Apple silicon and Intel Macs

One of the most popular and practical methods of starting your Mac up in one of two or more versions of macOS is to install the second on an external disk, making it bootable. This article steps through how to do this on an Apple silicon Mac, and summarises methods for Intel Macs.
Before starting this, consider whether you need to disable any third-party security software, as that could intervene and cause painfully slow installation, or even block it altogether. You should also check that the version of macOS you’re going to install can start your Mac up. Databases such as Mactracker should be able to confirm whether that Mac can run that version.
Unfortunately, even if an older version of macOS is compatible with your Mac, running its installer may be blocked by more recent macOS. If that happens you’ll need to create a bootable installer disk and run the installation from that. Apple describes how to do that in this support article.
Apple silicon Mac
All Macs with Apple silicon chips can start up from a bootable external disk without reducing their boot security using Startup Security Utility. To do so, they use a LocalPolicy system that depends on the user having access to a private Owner Identity Key in the Secure Enclave, making that user an Owner. I have described this in more detail here. Following these steps should ensure that works correctly.
Connect and prepare the external disk
First catch your disk, and connect it to one of the non-DFU ports on your Mac. For example, on my Mac mini M4, that’s either the left or right Thunderbolt port, as the middle one is its DFU port. On all other Apple silicon Mac minis, that’s either the centre or right port as you look from the rear, as their DFU port is the one on the left. If you try to install macOS to a drive connected to an Apple silicon Mac’s DFU port, then it’s doomed to fail, and that’s the most common cause of failure. More information on the DFU port is here.
Reformat that disk as you want to use it, with at least one APFS container containing a single APFS volume in regular APFS format (not encrypted).
Download and run the installer
Next catch your installer. In the App Store, macOS 15.x is unsurprisingly listed under Sequoia. Click Get and Software Update settings will ask you to confirm that you want to download it.
If you want anything older than the current version of macOS, obtain it from a listing such as those maintained by Mr. Macintosh. You want a regular installer, not an IPSW image file that you might use to create virtual machines.
Run the installer app from your main Applications folder.
When it asks you whether you want to install macOS on your current system, click on Show All Disks…
Select your external disk from the list and click Continue. If your disk isn’t recognised or listed there, reformat it and start again.
Ownership
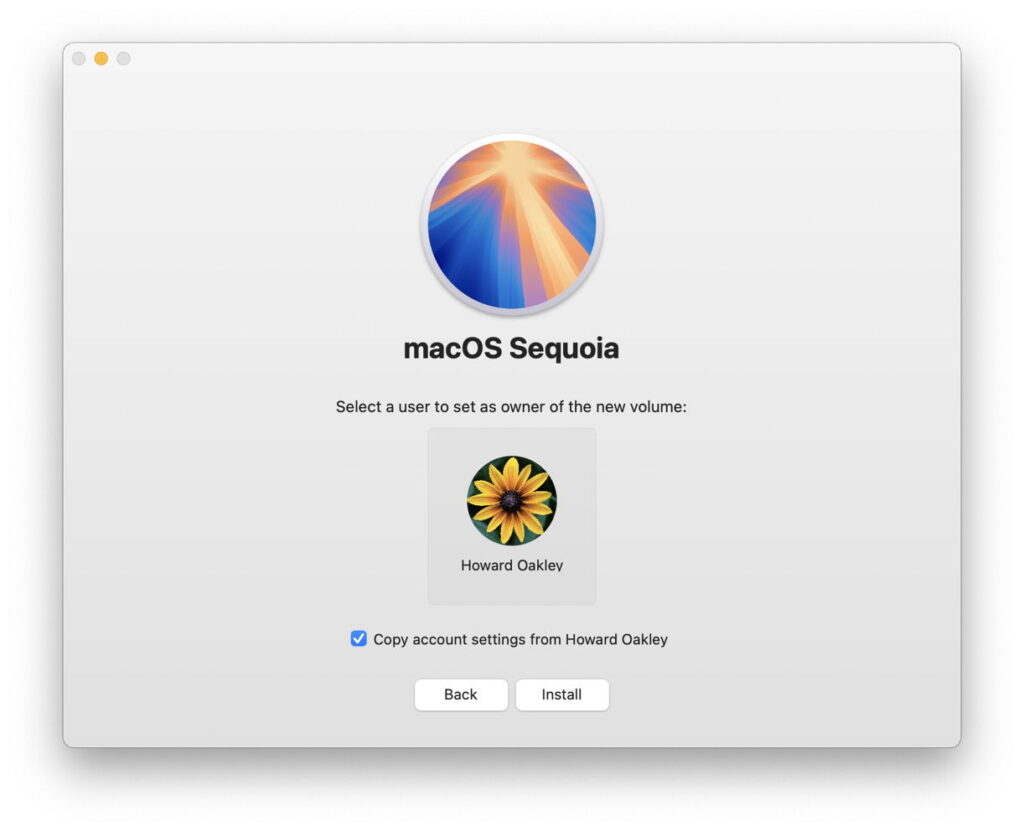
Before installation can start, ownership for the new boot volume group needs to be established, so macOS can create its LocalPolicy. Here, I follow the standard approach as the most reliable.
When prompted to select the user to be owner of the new boot volume group, pick the current admin user, and tick to copy their account settings.
You’ll then be prompted to enter that user’s password to authenticate as the owner.
Installation follows, and is (as ever) highly non-linear, and may even appear to stall. Persevere, and it will then close apps and restart to complete.
When prompted to Create a Computer Account, it’s easier to create a local admin account for the owner. The new copy of macOS will then take you through personalising your new system, and, if you’ve added support for your Apple Account, it will do the 2FA dance for iCloud and Apple Account, and so on.
Once configured, you can share that external disk between Macs, but each time you boot from it on a different Mac, you can expect to repeat the 2FA dance for iCloud and Apple Account.
Intel Mac
For an Intel Mac with a T2 chip, the only novel step is to enter Recovery mode, and there open Startup Security Utility from its Utilities menu. At its foot, click on Allow booting from external or removable media, which permits your Mac to start up from your external disk. Restart in normal mode, connect your external disk, format it, download the installer, and install it in the normal way, ensuring you set the new system to be installed on your external disk.
Intel Macs that don’t have a T2 chip are even more straightforward, as that step in Recovery mode isn’t necessary (or possible).
All Macs
Once installed, you’ll almost certainly want to keep that external system up to date. To do that, start up from that disk, and use Software Update as normal. Although you could download that latest macOS installer and run that, that’s a much larger download and there’s always the risk it might run a clean install, forcing you to restore from your latest backup. Apple no longer provides downloadable updaters for macOS.
When you update macOS on that Mac, the firmware in it will be updated by the most recent version of macOS you have installed or updated it to, whether that’s on the internal or external disk. To update firmware, you have to install the appropriate macOS update on that Mac. If you update your external disk using another Mac, then that won’t update the firmware in your Mac. That can only be done by performing that update on that Mac.


