What to do when switching to a Mac with a smaller drive
[ad_1]
For reasons of cost, we might buy a new Mac with a smaller drive than the one we’re replacing. If your current Mac has more data stored than the capacity of the new one, you probably feel you’re in a pickle. But you can strategize how to make this transition work.
When planning the transistion, I highly recommend that you try to keep free at least 50GB on a 256GB drive, and 100GB on drives that are 512GB and larger.
Here’s how you can reduce your storage requirements before migration.
-
Enable iCloud Photos and set Photos (in Photos > Preferences > iCloud) to store only optimized versions of your images. This does result in you not having the ability to create a full local backup of all your media, and may require an upgrade from your current iCloud storage level. However, it can be worth the tradeoff of hundreds to several hundreds of dollars for a larger-capacity drive on the new Mac.
-
Use optimized storage in macOS via the iCloud preference pane in Mojave and earlier or the Apple ID preference pane’s iCloud view in Catalina and later. Selecting Optimize Mac automatically offloads files synced via iCloud Drive to your iCloud storage as needed.
Optimize Mac Storage lets you offload unneeded files to iCloud Drive across many apps and for general storage.
-
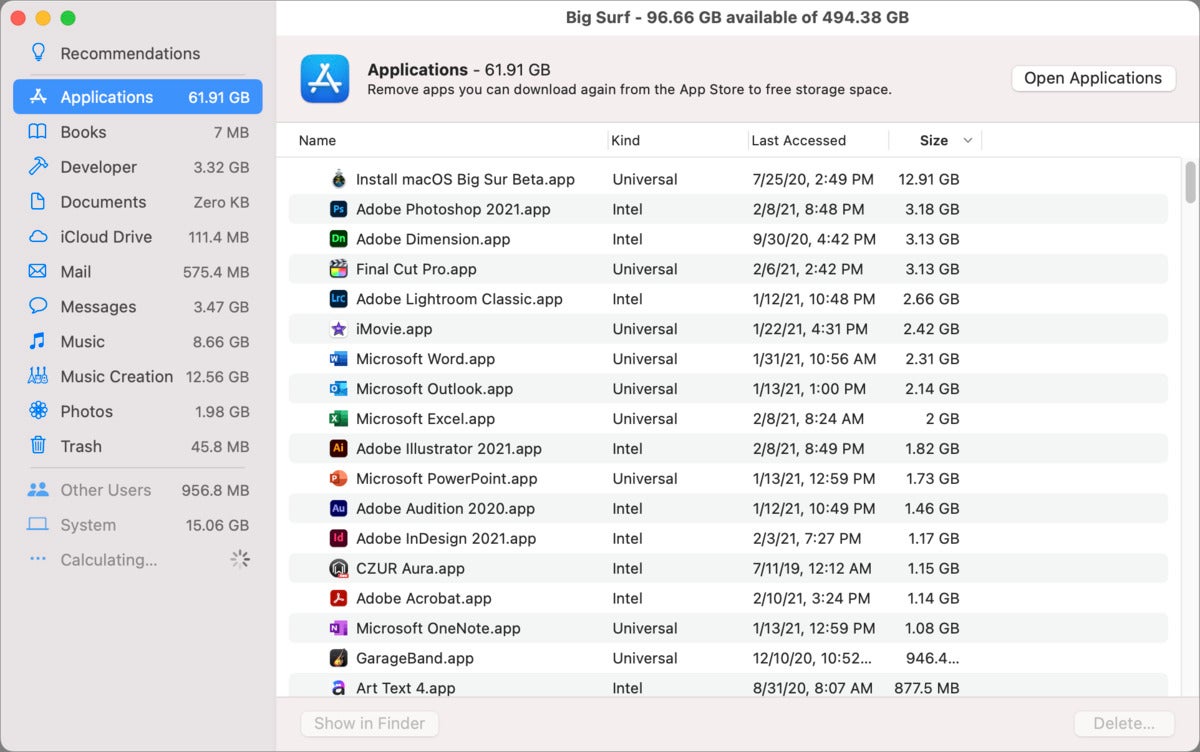
Get help from macOS in finding items to delete. Choose > About This Mac > Storage and click Manage, and macOS makes a number of suggestions about how to reduce drive consumption. You may find (as I did) some large files you’d forgotten about. On my laptop, I had a nearly 13 B Big Sur beta installer.
 IDG
IDGmacOS offers insight into the files that fill your drive, including forgotten ones—like a massive beta macOS installer here.
-
Use Spotlight to identify large files and apps with a Finder-based search. This can reveal items that the Storage view in the previous bullet point does not.
-
If there are items you want to be sure you retain but don’t need “online”—i.e., directly and always connected to your Mac—transfer them to an inexpensive external hard drive, but be sure you have separate backups of that drive. (Some online backup services will only keep archives of attached drives for about a month at their basic service level without them being attached. Either set a reminder to attach and power them up monthly, or pay an additional fee, as with Backblaze, for longer-term storage.)
Once you’ve reduced occupied space below the level needed to transfer to a new Mac—being sure to empty the Trash—you can perform your migration. You can use Migration Assistant to transfer between the two machines either while both are booted into macOS, or if you’re starting up the new machine fresh or after having erased the drive and installed macOS from scratch.
If you want to use Time Machine for the migration, be sure after deleting files to select the Time Machine menu in the system menubar and choose Back Up Now. This doesn’t delete the files you’ve removed from your Mac from the Time Machine backup immediately. That will happen in time. But it does immediately create a new snapshot with the just the current, reduced set of files that you can use to migrate to a new Mac.
This Mac 911 article is in response to a question submitted by Macworld reader Jim.
Ask Mac 911
We’ve compiled a list of the questions we get asked most frequently along with answers and links to columns: read our super FAQ to see if your question is covered. If not, we’re always looking for new problems to solve! Email yours to mac911@macworld.com including screen captures as appropriate, and whether you want your full name used. Not every question will be answered, we don’t reply to email, and we cannot provide direct troubleshooting advice.
[ad_2]
Source link


