Ableton Live 11 Suite review: Audio workstation built for the creative musician
[ad_1]
Apple’s feature-packed Logic Pro software gets the lion’s share of attention from the musical-oriented Mac media—with a gigantic feature set and at its comparitively affordable $200 price, that’s rightfully so. However, Logic, like nearly all Digital Audio Workstations (DAWs), follows a design bent more on accomodating studios and audio engineers than creatives. Ableton Live, on the other hand, is a DAW that was designed by musicians for musicians, and likely a better fit for the average Mac-wielding, musical type.
Programs such as Logic, Pro Tools, and Cubase trace their lineage back to the 1980s. Ableton Live is a relative newcomer, appearing around 2000. As its name implies, Ableton (the company) designed Live at the outset for live performances and quick composition using audio samples.
An early version of Live on OS X. It’s still easily recognizable to this day where others are not.
To Ableton’s credit, the initial keep-it-focused design was spot-on, and it has maintained much of its unique and original flavor, even with two decades of improvements and new features. The look has evolved in restrained fashion, but remains instantly recognizable. Some love it, while for others it’s an acquired taste.
With version 11, Live has matured into a DAW that could reasonably be employed in a recording studio. But first and foremost, it remains a tool created for and by artists.
Features and interface
Live’s once-unique aspect is how it compartmentalizes musical material into “clips”, anything from instrument samples, to MIDI sequences, to full songs. This aspect has since been copied by other DAWs.
 Ableton
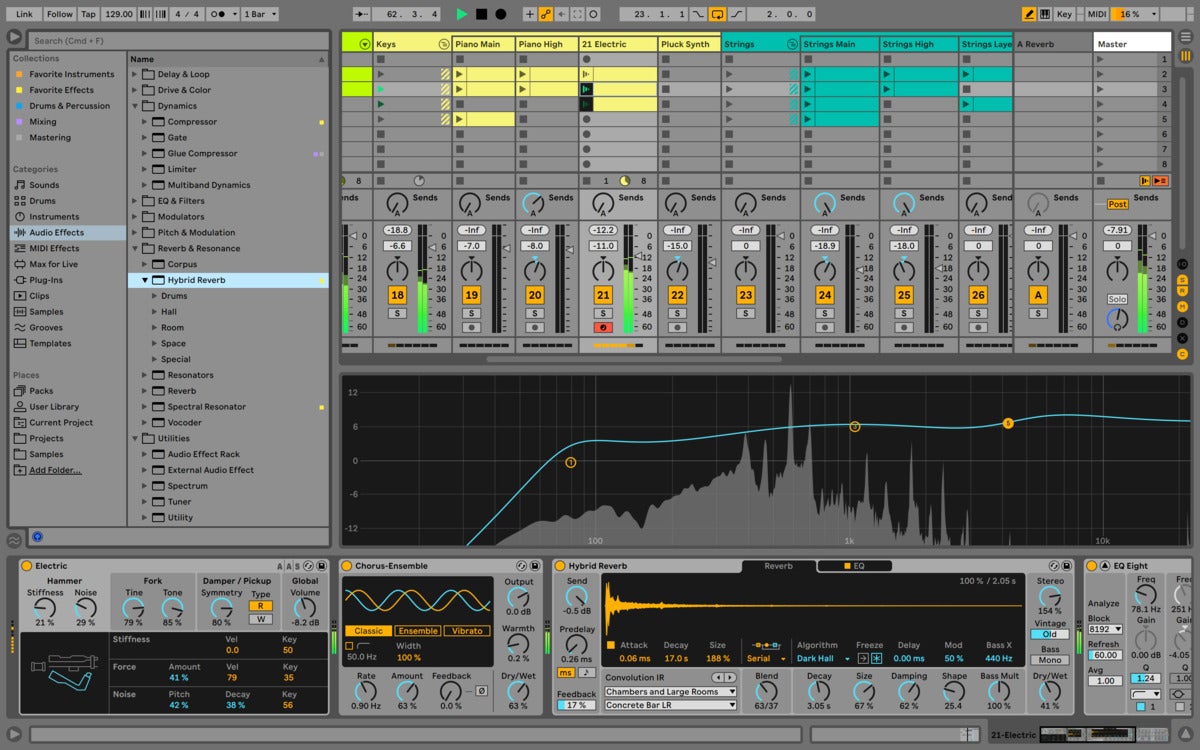
Ableton Live 11 in Session mode. Clockwise from upper left: the media browser, the clip launcher, the mixer, and the detail view containing instruments and effects.
In Live’s Session mode (shown above), clips may be launched individually (one per track) or in groups across tracks. This is great for DJing or live performance (you can edit and create while clips play), and as a quick and dirty arrangement tool for composers. Competing DAWs have similar features, but by my lights, Live’s implementation remains the most focused.
 IDG
IDGA closeup of the Live 11’s clip launcher in Session view. Notice the play buttons and the scene button for launching an entire row of clips.
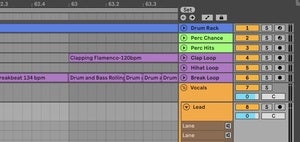
Live has also featured a traditional, track-based timeline (Arrangement view) since day one. It’s a bit non-standard with the track headers positioned to the right (footers?), but it’s nothing users from other DAWs won’t settle into quickly.
You can switch between Session and Arrangement views (which share the same track layout) using the Tab key. Clips are exclusive to each view for playback, but may easily be copied between them via drag and drop, Command-C, etc.
 IDG
IDGA closeup of the Ableton Live’s Arrangement view.
Live was also the first DAW to ditch the once prevalent Multi-Document Interface, a stack of child windows for “panes” that fit into the main window with no overlapping. If you ever had to hunt through the pile of virtual (software) instruments, you’ll appreciate that.
There are a number of normally hidden panes accessible from both views: a content browser (files, FX, sounds, samples, tracks, etc.); a groove pool for applying MIDI grooves to MIDI or audio clips; a help pane that’s an overview of the content along the timeline; a file/project manager; and, of course, audio and MIDI editors.
 IDG
IDGAbleton Live’s MIDI editor.
The audio and MIDI editors, instruments and effects share the bottom pane. When clips are selected, the appropriate editor appears, and when a track is selected, you get the instruments and FX.
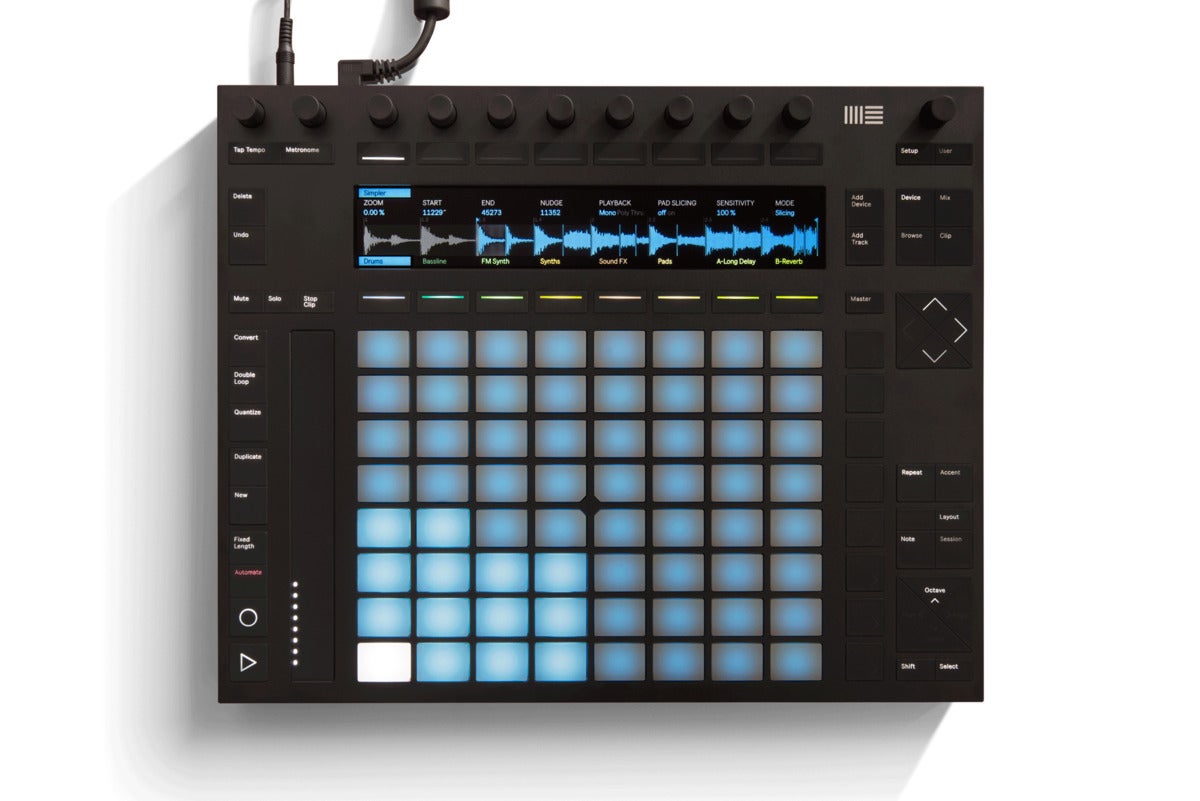
Live is especially flexible when it comes to combining instruments and effects into drum, instrument, and effects “racks”. Combine them, stack them, switch between them using “chains”, and assign various parameters to macro controls for use in real time. The sound creation (inventing your own unique noises) possibilities are endless. The whole deal interfaces with Ableton’s own hardware Push controllers.
 IDG
IDGAbleton Live’s detail view shows editors when clips are selected, and instruments and FX when tracks are selected.
As for audio editing, Live has featured audio stretching since the early days, and it’s easily the most facile implementation of it among the major DAWs. Command-A/Command-I/Command-U and your audio file is quantized to the current value (1/4 notes, 1/16 notes, etc.).
 IDG
IDGLive 11’s audio clip editor. The high-visibility mustard colored markers are for stretching or time aligning audio events under the difficult lighting conditions you sometimes find in clubs. Each marker resides where the program detects as a transient, or the loudest portion of a note/chord/sound.
You can also simply drop a Groove onto the clip to quantize it. The transient markers are large and obvious for easy recognition under the challenging lighting conditions you might find at a gig. Markers are also easy to manipulate manually if you just want to correct that one egregiously late note, and in bulk if you need to adjust the entirety of a time-askew performance .
There’s no ARA/ARA2 (Audio Random Access) integration so you can’t employ Melodyne for pitch manipulation. Pitch manipulation is possible by splitting clips in the Arrangement view and using a detune function that works in cents (1/100 of a semitone). Not ideal, but good for the odd correction here and there.
Ableton supports third-party instruments and effects (AU, VST2/3), but also ships with a host of its own (depending on the version—see below), which are seamlessly integrated into the software interface.
Scalable, scheme-able
Live’s scalable interface was another ground-breaking feature. Everything is rendered and/or a simple stretchable bitmap, so you can make elements and text as small or large as you wish. Bitwig, Tracktion, and others also do this, but Live was the first.
In general, everything is created with quick and easy recognition in mind—a real blessing if, as I’ve mentioned, you’re gigging in a difficult environment such as a dance club. Scaling is also great for anyone with eyesight issues.
 IDG
IDGLive 11 at 100% scaling and 200% scaling with the same song. You can also run the program full-screen to recapture the space taken up by the menu.
Notably, you can run Live full-screen to recapture the space normally used by the main menu. Moving your mouse to the top of the screen reveals said menu when you need it. Live also supports different color schemes and a third-party online scheme/theme generator is available at Live Themes 2.0.
News at 11
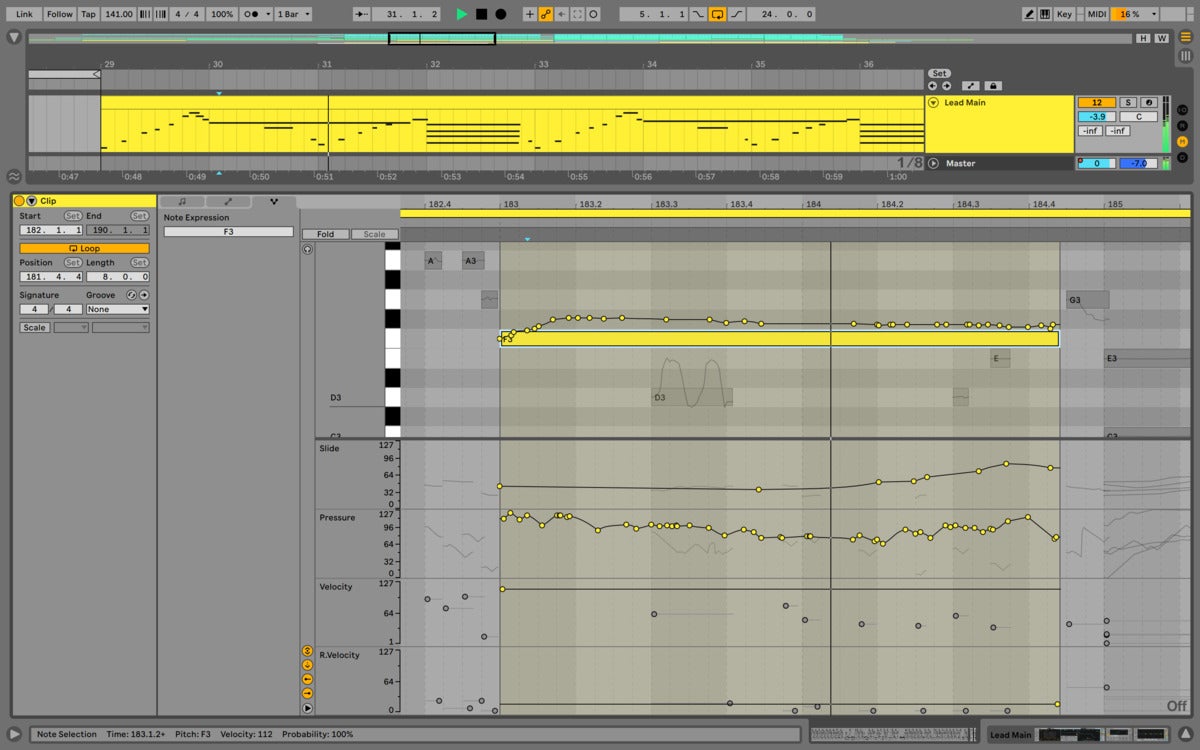
A huge new feature for cutting-edge keyboard performers is vastly improved support for MIDI Polyphonic expression (MPE). MIDI, the digital communications protocol for musical equipment, originally followed a strict one channel/one instrument model. MPE took the original 16 channels and re-tasked them for use on a single instrument, allowing each note to use the corresponding channel’s expression data (pitch bend, modulation, pressure née after-touch, etc.). Where Live formerly required recording on the 16 different tracks to capture and edit MPE, it now only requires one. See the image below.
 Ableton
Ableton Live 11’s MPE editing. If you’re rocking a Seaboard or similar, Live now has you covered.
MPE opened up huge performance possibilities for solo keyboard players, hence my reference to cutting edge. As it’s better heard than told, you should take a gander at this excellent demonstration video. Note that MPE is now part of the latest MIDI 2.0 specification.
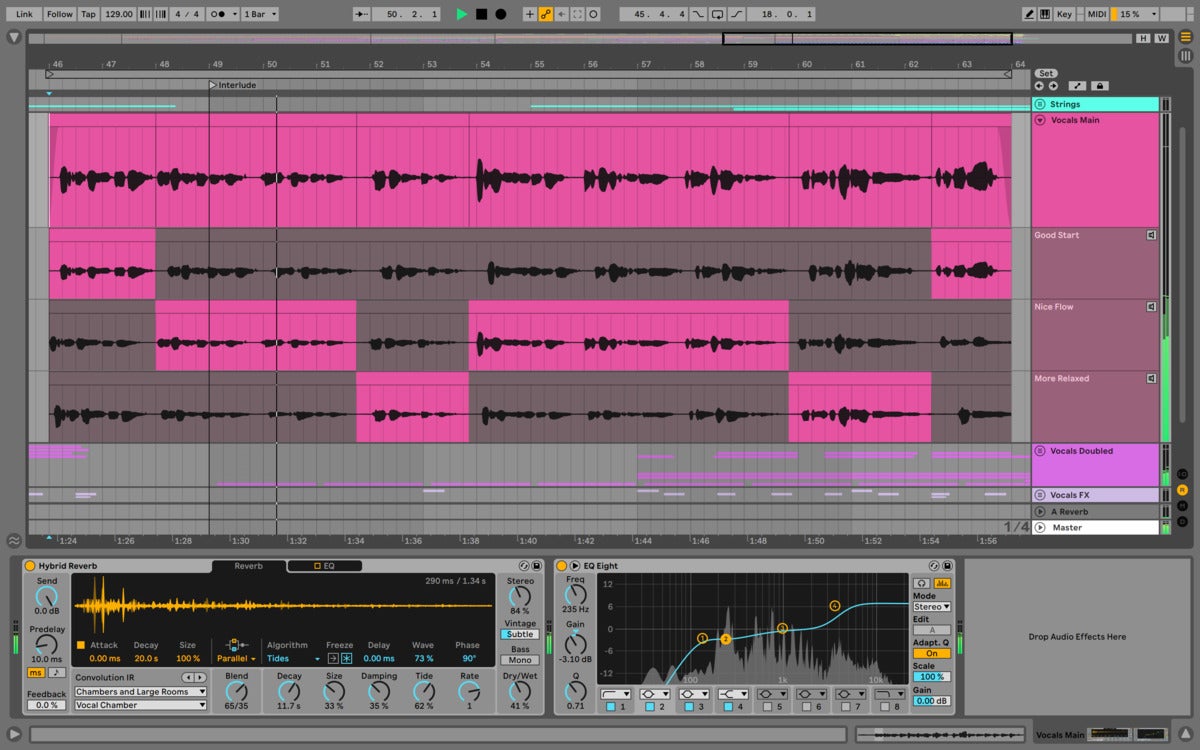
Two new features in Live make the software truly studio-viable: comping lanes and linked track editing. Comping is creating a “perfect” performance by combining the best parts of several takes. Formerly in Live, you had to use different tracks or a rather clever but click intensive workaround to comp. Now you have lanes, or sub-tracks that you can just swipe parts of to create the “perfect” take in the playback track. For a multi-microphone recording, you can link the separate tracks and lanes so that the most common edits are performed across all the linked material. Edits are phase-locked as well, i.e. extremely precise.
Rather unusually, you can comp the same way with MIDI tracks. It’s a bit like Logic’s track versions, but without the extra fuss. Nice touch, Ableton!
 Ableton
Ableton Live 11’s audio comping. You can do the same thing with
Live 11 now supports tempo matching to external sources, i.e., you can have Ableton Live play along in time with a real drummer. Formerly, you could only use the tempo track or define an existing track as a master.
New content packs as also available—including brass and string quartets from sample library heavyweight Spitfire—and other content packs have been updated and improved. A number of improved or new FX—including my favorite, Hybrid Reverb—combines convolution (using models of real spaces or devices) and classic artificial reverb.
Spectral display is a big deal for version 11 and is present on several effects including a new delay and resonator. Macro controls double from 8 to 16 and can be saved as instantly switchable presets.
The MIDI editor now has the ability to collapse to a scale with highlighting, so you can easily paint notes without straying outside the basic harmonic structure of a clip. You can also now paint notes of differing pitches rather than just a row of the same pitch.
Live has always had a small amount of random that you could apply via MIDI grooves, but the company has gone all in on the concept with version 11. Not only is there a new random function for velocity in MIDI clip, there’s note probability—whether or not a note will be played at all. These to additions help alleviate robotic-sounding MIDI clips. There are other manifestations of random sprinkled throughout Ableton Live 11.
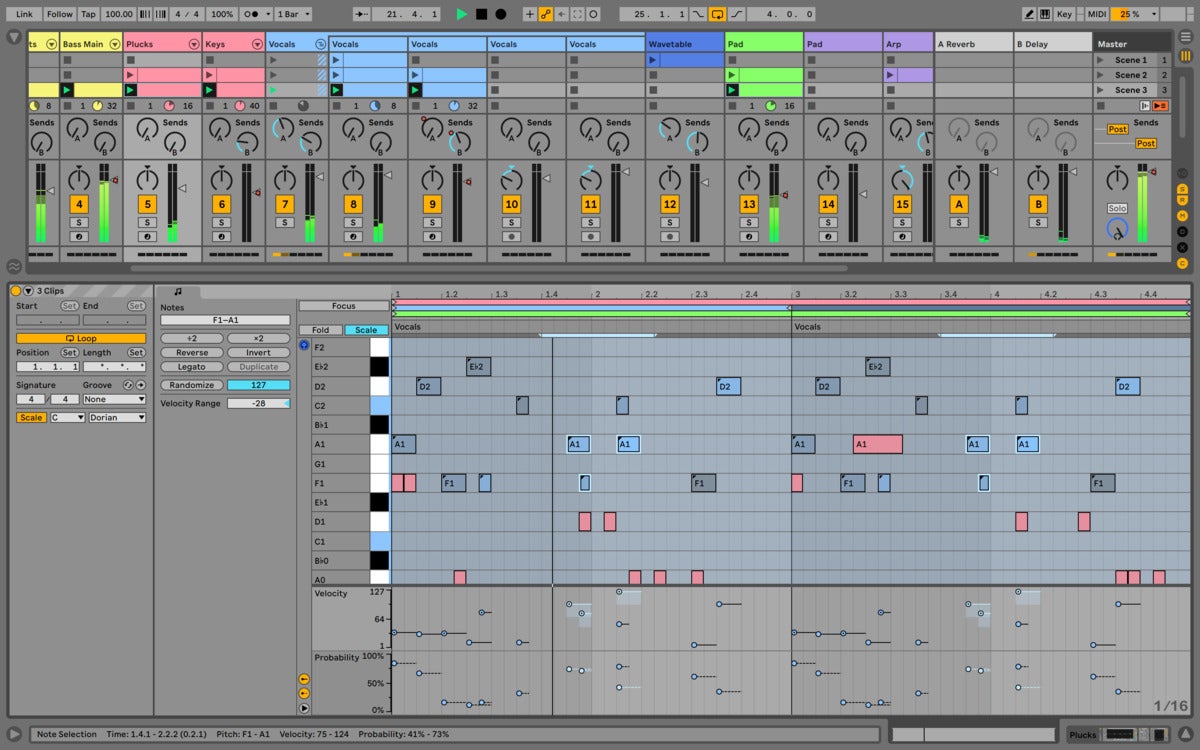
With multi-clip editing, you used to be able to select multiple clips, view the combined contents, but edit only one clips’ notes at a time. Now you can edit notes from all selected clips simultaneously. Oddly, however, note velocities (how hard a key is struck) are still edited on a per clip basis. Here’s hoping that changes in 11.1.
Some users are also hoping you’ll one day be able to can edit MIDI and audio clips together. That may sound odd, but it can be very handy for synching virtual instruments (MIDI) with audio recordings.
 Ableton
Ableton Live 11’s multi-clip editing now allows you to edit notes from all selected clips at the same time. The colored bars at the top of the editing pane indicate which track and clip the notes are from.
The major new features are very good, but two small tweaks actually convinced me to dump Live 10 for 11. Pressing the “C” key now arms or disarms the current track for recording, and if you start typing a number while a note is selected in the MIDI editor, it will change its velocity. The latter, combined with the randomize velocity function, is a colossal timesaver when I tweak my weak keyboard or drum performances. Command-Up/Down to change the note selection is a cool add, as well.
Performance on Intel
Live is a bit of a CPU hog. Audio warping is basically always-on (you can enable/disable it for individual clips) and allows you to speed up and slow down songs without so much a how-do-you-do. Also, for live performance Live must play back glitch-free, while other operations are being performed. Given those constraints, Live does quite well, thank you.
Indeed, I can manage with Live on a 2011 MacBook Air if the project is mostly audio. If you’re the type that has to have 43 instruments and effects on every channel, err… use Return tracks (busses in Logic), or consider simplifying your approach.
 Ableton
Ableton’s Push 2 controller/hardware interface for Live.
In my expereince, Live sounds as good as other DAWs. I’ve blind tested every major DAW, and given the same plug-ins, they all sound fantastic, not to mention nearly identical. There must be some correlation between Live’s unusual appearance and the perception of sound quality, because Live’s sound quality is often questioned. Put bluntly, worrying about the audio quality produced by any modern DAW is a waste of time.
M1 support?
I tried Live 11 via Rosetta 2 on an M1 Mac mini, and the interface and load times are super quick—a real joy. However, during playback, CPU usage sat at around 30 to 35 percent for the Live Demo song, while it was only 25 percent or so on my older 2015 Core i5 iMac. That’s a lot better than Live 10 (until the most recent beta), and quite the accomplishment, but hardly showing off what the M1 can do.
I inquired of Ableton if there were plans to recompile (and recode if necessary) Live to support the M1 natively. The the company largely demurred from comment. However, I opined to them that any company selling programs for the Mac would have to be insane not to port, and Ableton assured me that it is quite sane. Basically, you can dye my body hair green and call me Kermit if an ARM port doesn’t transpire in the relatively near future. I give it a year at most. Likely much sooner.
RTFM and nits
If you’re used to other DAWs, Live may not always seem intuitive. It goes about a lot of things differently. If you think of it in the context of live performance, most of it makes sense and some of the methods are insanely clever. Other times they’re just clever. Occasionally, they’re odd for no reason.
The sooner you stop trying to make Live conform to the methodology of other DAWs, the sooner you’ll begin to appreciate the method behind the madness and be productive. I highly recommend a thorough perusing of the users guide before starting.
Of course, I have a few gripes. For instance, Ableton is very particular in its keyboard shortcuts; there aren’t enough of them and they’re only partially user-definable. Hence my delight at the new track arm/disarm and note selection shortcuts.
I’m quite often holding an instrument and don’t want to contort my hands to accommodate compound keystrokes such as Shift-Command-L, so I define my own single key shortcuts using Keyboard Maestro (and AutoHotKey on Windows). Hint: Make good use of the numeric keypad and function keys as neither program recognizes when you’re trying to rename a track or enter data.
There are also tiny behavioral inconsistencies throughout the program, such as Shift rather than the Command modifier key being used for selecting multiple non-contiguous notes in the MIDI editor; double-clicks that open, but don’t close items; etc.
 IDG
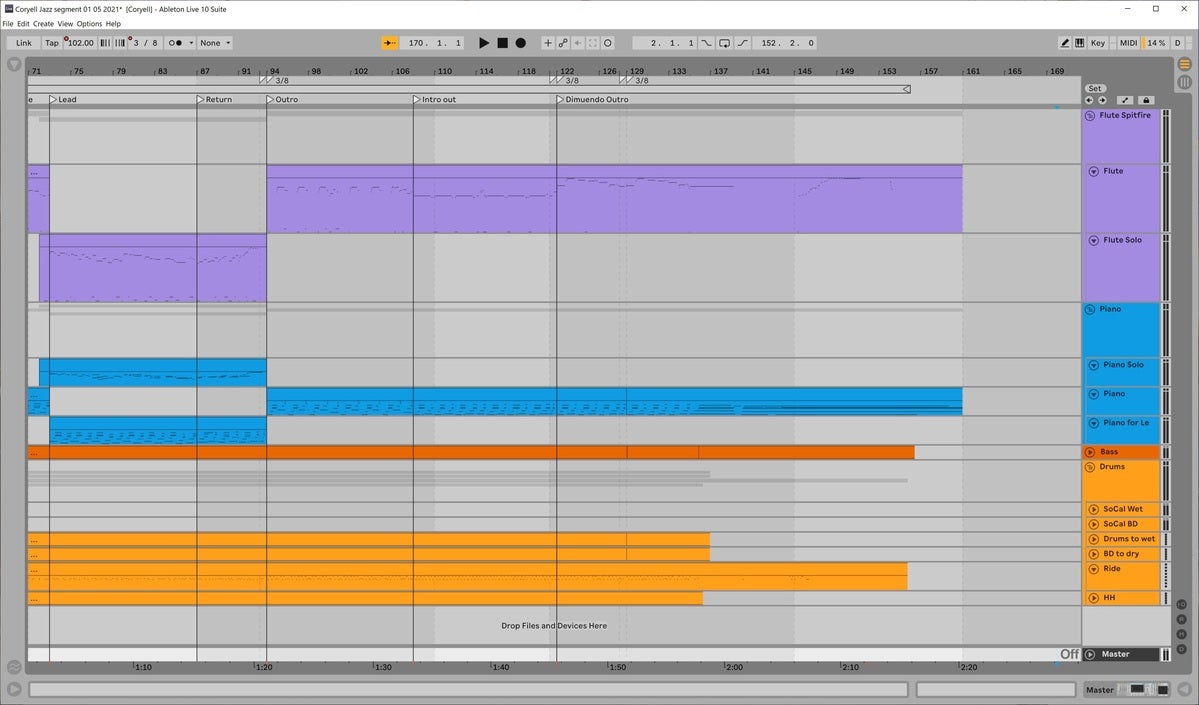
IDGAs most of the screens in this article show lots of stuff, I thought I’d include one that shows how clean it can actually be. This is how I keep the interface most of the time. Tip: You hide the vertical grid lines by upping the snap value to more bars than are visible on screen, e.g. 32/1. I wish you could just turn them off, along with the horizontal lines.
My primary concern, however, is increasing complexity and visual clutter. With a burgeoning feature set, menus are growing longer, and visual feedback for various functions is piling up. The interface is still a gem, but slippery slopes… My hope is for deeper user configuration options. Ableton walks its own path. Kudos for that. We’ll see.
Not exactly cheap
Where Logic, at a mere $200, is by far and away best DAW value on the planet, Live is, uh… a more considered purchase. There’s a tantalizing $99 Intro version, but the 16 track/16 scene limitation is just that—limiting. I engineered with 16 track recorders. 24 tracks opened up worlds, if you catch my drift.
The pricier $449 Standard version is the likely entry point for most users, as it has no limits and contains an abundance of effects and instruments.
The full $749 Suite adds another boatload of stuff, including attractive additions such as a full multi-sampler; the Max for Live programming/plug-in development environment and its instruments and effects; and CV (Constant Voltage) support for the modular synth crowd.
Ableton’s comparison chart will help you determine which version is the right one for you. Upgrades costs are generally only the price differential between the different flavors so you can start low and work your way up without a surcharge.
Bottom line
Ableton Live is by far the best DAW for artists and performers—once you get a handle on it. It can be a visual and operational challenge initially, especially if you’re coming from a traditional DAW such as Logic, Cubase, or Pro Tools. It took me about three attempts before I got it.
Moiling or no, it’s ace for live performance and quickly laying down ideas, and the only DAW that can match it for sound creation and mangling is Bitwig. While version 11 is perfectly workable for studio use, it’s probably not going to be most an engineer’s first choice.
Happily, you don’t have to take my word for any of this—a 90-day trial is currently available. I recommend that you take a long hard look, no matter what your musical bent or current DAW preference. But before you do, again, read the user’s guide. Live is different. And it’s full of stuff even experienced users sometimes don’t know about.
Note: While Live was the first popular clip-based composer in the modern era, the concept dates back to the Atari ST era and Eric Amere’s RealTime. That program also allowed editing MIDI “phrases” (a.k.a. clips) while others were playing, albeit on a single track.
[ad_2]
Source link


