How to access a Mac remotely to help a friend or family
[ad_1]
We all have friend, relatives, and sometimes colleagues who need our technical assistance. Without being able to put our hands on their computers, remote screen control is a huge help. Instead of talking them through a complicated scenario or debugging it by their description, you can see and control their display. One colleague told me they still have hair left because they were able to put remote hands on their elderly mother-in-law’s computer to help her out.
I wrote previously about using a somewhat hidden feature in Messages that relies on iMessage and iCloud to use the built-in Screen Sharing app in macOS to share your own or request to share someone else’s screen. It’s simple and reliable.
However, there are ways to scale that fish, including an overlooked option in Screen Sharing that provides something like a hidden “Back To My Mac” option—Apple’s discontinued remote-access service for your own devices.
Use Screen Sharing and an Apple ID
In “How to share your Mac’s screen the quick and easy way in Messages” earlier this year, I explained the relatively complicated process of using the Messages app in macOS to navigate to a set of screen-sharing options.
But it turns out there’s another way that doesn’t require Messages when you want to see or control someone else’s screen with their permission. I would still start with Messages, despite the several steps for you to initiate sharing your screen or requesting the other person’s, because it involves no effort on their part beyond having an active iCloud account that’s logged into Messages, and click a response in a dialog box after you initiate either direction of remote access.
This alternate method can be even less effort if the other party is set up correctly, but may require handholding if they are not. You use the Screen Sharing app and enter a valid Apple ID address for the other person.
This works if the other person is logged into iCloud on their Mac via the iCloud preference pane (Mojave and earlier) or the Apple ID preference pane’s iCloud view (Catalina or later) via an Apple ID. I’d wager most people are, because of how Apple promote and encourages the use of iCloud and an Apple ID. If not, you need to walk them through setting up an account or logging in with it.
If they’re set up, here’s how this can work without additional effort, with more troubleshooting to follow:
- Launch Screen Sharing. It’s found in
/System/Library/CoreServices/Applications, which seems like an odd place. You can access that in the Finder by choosing Go > Go To Folder and pasting that path in, then double clicking Screen Sharing. But you can also use Spotlight (Command-space bar) and enter Screen Sharing. If you use it frequently, open the folder, and Command-Option-drag it to the Desktop or another location so you can launch it more easily.
2. A Screen Sharing dialog with a Connect To field should open. (If not, choose Connection > New.) For anyone in your Contacts list, you can start typing the name, and select a match. You can also type in or paste in their iCloud-linked Apple ID.
3. Click Connect.
4. On the other end of the connection, if all is well, the recipient will receive an alert. They should click Accept, which launches the Screen Sharing app.
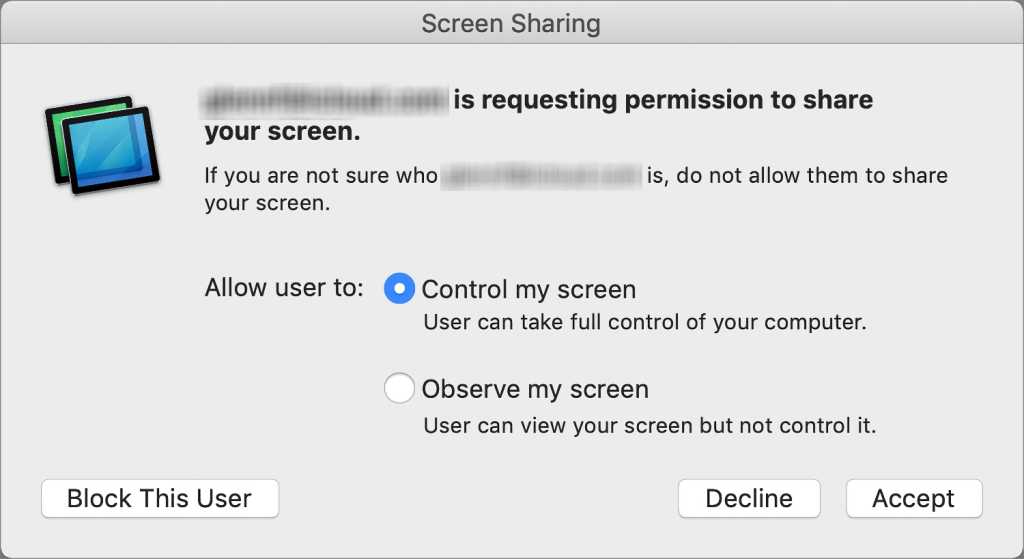
The other person sees a request to allow you to share their screen, showing your Apple ID-associated email address.
IDG
5. The other party now receives a more elaborate explanation with more options within the Screen Sharing app. They can opt to let you control or observe and then click Accept. (They also have the option to decline or block the incoming request.)

Before screen sharing starts, the sharing party has additional options and approval.
IDG
You should now be able to remotely control (or observe) their screen.
If the other person never receives a message as in step 4, they may need to check their Sharing preference pane for two configuration steps:
- Check Screen Sharing in the left-hand Service list, then select it and click Computer Settings. Check the box “Anyone may request permission to control screen.” Click OK.
- If Screen Sharing says that Remote Management handles those settings, select the Remote Management item (which should be already checked if it’s managing the setting), and click Computer Settings_. Check the same “Anyone may request…” box and click OK. Then click the Options button and select Observe, Control, and Show When Being Observed, and click OK.
In some cases, people’s local network configuration may continue to make this connection fail. In that case, you may want to try either of the next two options.
Access a remote screen via Zoom
While Zoom is known as a teleconferencing service, it has a lot of additional features. That includes a slightly hidden remote control option it labels as Suport in the macOS and Windows versions of their app.
The other person only needs to have the Zoom app installed, which is free and hundreds of millions of people have it already downloaded for work, school, and social purposes. A key thing, though: Zoom doesn’t properly prompt to update its software when it’s launched. I suggest before you start the below, you may sure that both you and the person you’re going to connect with have selected zoom.us > Check for Updates and installed any update that appears. (The zoom.us label for the app varies by country.)
If the other party is running a version of macOS recent enough to require adding permission for apps to the Security preference pane’s Privacy settings, Zoom will prompt them for permissions when you try to start remote access. This requires them to make changes and then quit and re-launch Zoom, which may be confusing. You could instead guide that person through the following:
- Quit Zoom.
- Open the Security & Privacy system preference pane.
- Click the lock icon in the lower-left corner and either authenticate via Touch ID if available or enter an administrator account and password.
- Click the Accessibility link in the scrolling list at left.
- Open the Applications folder and drag the zoom.us (or similar) icon into the list of apps at right in that pane, and check the box next to it.
- Repeat this for the Screen Recording item.
- Launch Zoom.
As the initiator of the session, you have to change host settings with a free or paid account, or at least check what the settings are. At the Zoom website, log into your account, and go to the Personal > Settings section in the left-hand sidebar. Search for the Remote Control setting and enable it if it’s off. (If your account is managed by someone else, such as in a company, they may need to enable this feature for you. If you’re an administrator, you may need to go to Admin > Accounts Settings to enable it for yourself and others.)
Now you can request to share someone else’s screen who is running Zoom on a Mac or Windows system:
- Start a Zoom meeting in the macOS app.
- Send an invite link to the other person.
- When they join the meeting, you can click a Support button that appears at the bottom of your screen and select Desktop Control. (If this doesn’t appear, the Remote Control setting isn’t enable as noted above.)
- They will be prompted to grant permission. If they haven’t gone through the steps above on a version of macOS that requires privacy permissions, they will need to do so now, including quitting and relaunching Zoom, and re-join the meeting.
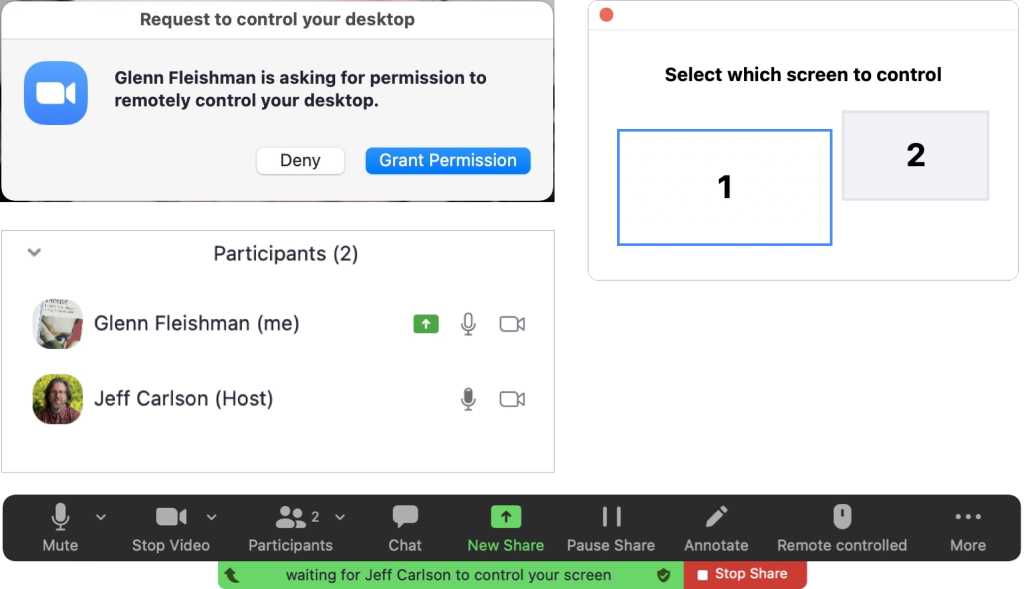
- Once they agree to give you remote access by clicking Grant Permission, you have remote control of their computer, including mouse and keyboard.

Upper left: The person whose screen you want to control sees a pop-up menu. Upper-right: When they click Grant Permission, you get a screen choice if they have multiple displays. Left middle: In the Participants view, the person whose screen is controlled has an icon with an upward-pointing white arrow in a green background. Bottom: The person sharing has a menu bar that can be expanded or hidden to show available options during the session.
IDG
If the other party has more than two screens, you will see a screen layout with the dimensions of those screens, and be able to select among them. You can click the close button on that selection window to dismiss it.
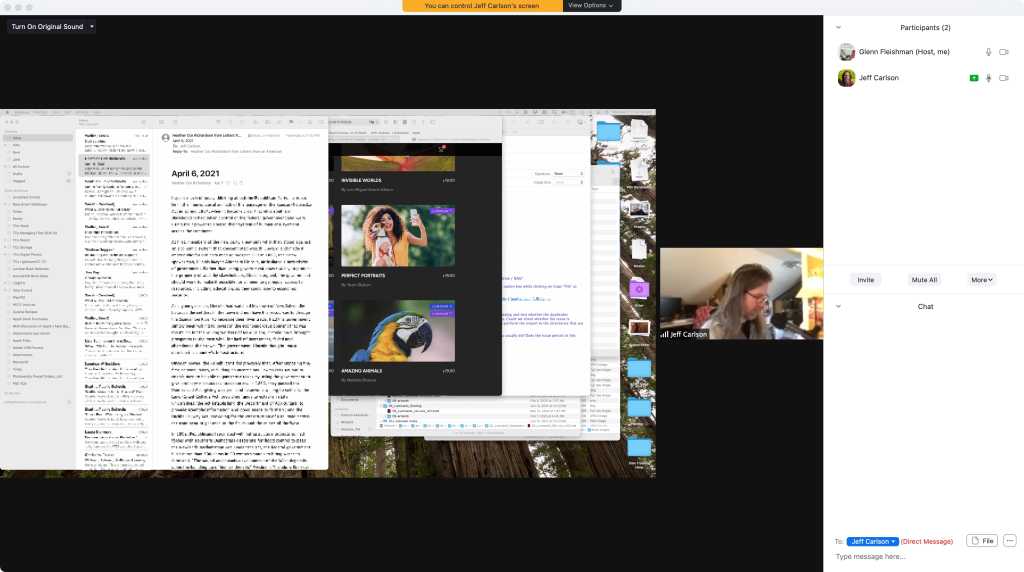
On the other person’s screen, they will see a green outline around the selected screen and a thin green banner at the top indicating their screen is being controlled. They can click Stop Share on that bar, or click Options_ to make other choices. Similar controls on your side let you end the session.

A screen shared via Zoom allows full access to a remote desktop. (Details blurred for privacy.)
IDG
Install the third-party Screens app
The Screens app also provides a simple way for Mac owners to control their own devices remotely and access someone else’s screen with a stripped-down version of the software. Screens costs $29.99 for a single-user personal or business license, and but the technical-support Screens Express software is available without additional charge. You can test this out with a trial version. (Personal users of Screens can install it on up to five Macs they own.)
After installing Screens, you can talk through your remote party in downloading and installing Screens Express. Its maker, Edovia, has a detailed and illustrated step-by-step set of instructions to install Screens Express, though I imagine for most people who need this kind of support, you will have to talk them through several of those steps, too.

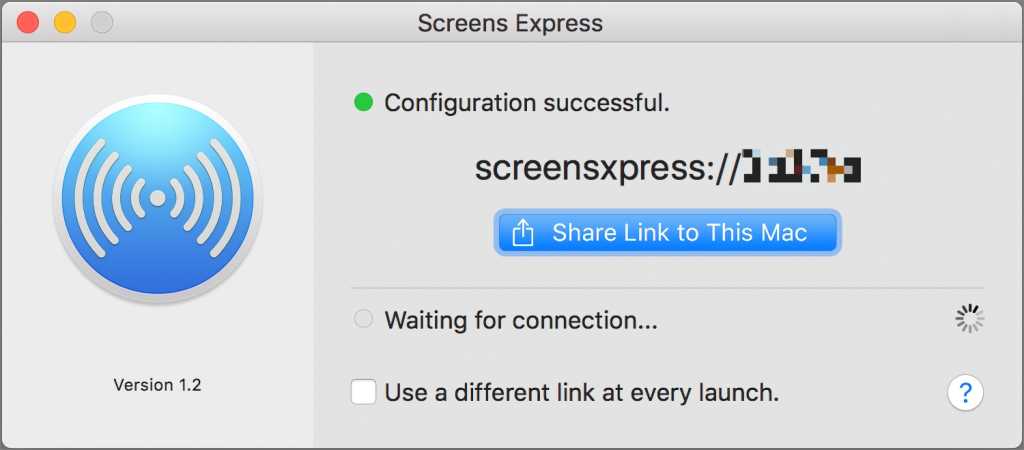
Screens Express makes it easier for someone without the software to let you share their screen by providing them a code they can share.
Edovia
Once the other party has installed Screens Express and sends you the sharing link, you can simply click it to open it in Safari, which will prompt you to open it in Screens, and then start a session. The other party will be prompted when the screen-sharing request comes in and can click Share Screen to proceed.
This Mac 911 article is in response to a question submitted by Macworld reader Marty.
Ask Mac 911
We’ve compiled a list of the questions we get asked most frequently along with answers and links to columns: read our super FAQ to see if your question is covered. If not, we’re always looking for new problems to solve! Email yours to mac911@macworld.com including screen captures as appropriate, and whether you want your full name used. Not every question will be answered, we don’t reply to email, and we cannot provide direct troubleshooting advice.
[ad_2]
Source link


