What happens when you run a macOS VM on Apple silicon?

Apple has invested considerable engineering effort in its lightweight virtualisation on Apple silicon Macs. Previously the preserve of those prepared to write a great deal of code to support a hypervisor, almost all the work is done for you on M-series Macs. This article outlines how it works as far as the Mac host is concerned.
Virtio
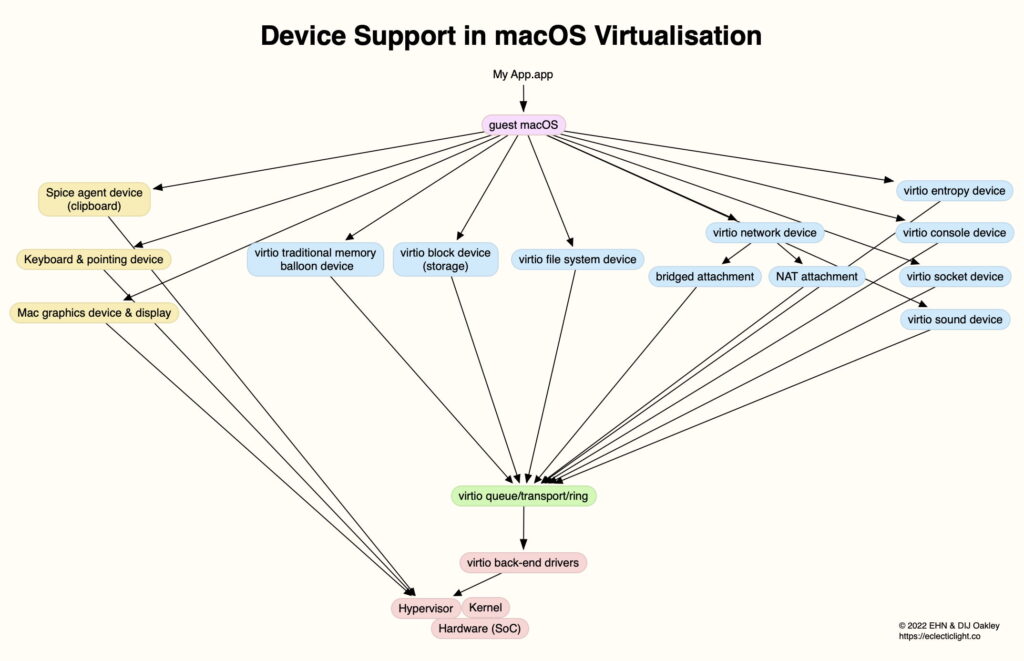
The biggest challenge, that of supporting all the devices that a Virtual Machine (VM) needs, is accomplished using abstraction layers and Virtio ‘virtual I/O’ devices. These rely on hooks built into the operating systems running on both the host and the guest (the VM). macOS Ventura and Sonoma support eight Virtio devices for macOS guests:
memory balloon, handling requests for additional memory,
block (storage), providing dedicated storage for the guest,
file system, for storage shared between the guest and host,
network, to access network interfaces, available as either bridged or NAT attachments,
entropy, for random number generation,
console, for serial communications,
socket, for shared sockets with the host,
sound, for audio.
In addition to those, custom devices are provided outside the Virtio standard for:
input, as keyboard and pointing devices,
Spice agent, to support a shared clipboard,
Mac graphics and display, including Metal and GPU support.
macOS Monterey includes basic support for most of these Virtio devices, and Sonoma brings some additions to those shown above for Ventura. Notable by its absence so far is support for Apple ID authentication, opening access to online services including iCloud and the App Store.
Virtualisation App
The disk space available to a VM is set when it’s created from its IPSW image file, but most of the other settings are made when the VM is about to be run. The virtualiser first creates a VM configuration, specifying the platform (Mac), its boot loader, the CPU count and virtual memory size, and a long list of Virtio and other devices including graphics (virtual display), storage, network, pointing, keyboard, audio, shared directories, and clipboard.
Once those are all configured, the app starts the VM and stands back ready to handle its stopping. Everything else is handled by macOS.
Virtualization Framework
(macOS)
Much of the work performed by the host Mac to run the VM is handled by a large XPC process, com.apple.Virtualization.VirtualMachine, in /System/Library/Frameworks/Virtualization.framework/Versions/A/XPCServices/com.apple.Virtualization.VirtualMachine.xpc, on the Signed System Volume. That sits alongside three other important XPCs:
com.apple.Virtualization.Installation, responsible for handling the installation of VMs, either from an IPSW image file for macOS, or a bootable Linux installer image,
com.apple.Virtualization.EventTap, giving the VM access to system events on the host,
com.apple.Virtualization.LinuxRosetta, giving access to Rosetta translation in Linux guests.
About 0.3 seconds after the virtualisation app has called for the VM to be started, the VirtualMachine XPC process is started as the Virtual Machine Service. On Sonoma, that service is checked by gamepolicyd to see if there’s an appex record for it, and whether it might need management as a game, hence is eligible for Game Mode. I doubt whether we’ll see the combination of game and virtualiser for a while yet!
By about 0.5 seconds, various services are being started to support Virtual Machine Service, including its Metal renderer under ParavirtualizedGraphics. That can be seen in the log in entries such as
0.646969 ParavirtualizedGraphics Enabling task service
0.656121 ParavirtualizedGraphics PGDisplay[0](Apple Virtual/0x12345678): Created
0.656259 ParavirtualizedGraphics HOST init 0x130028000
The EventTap XPC process is also engaged at this stage.
Then follows CoreAudio support, including HAL Voice Isolation support, and I/O USB controllers in IOUSBHostControllerInterface. The final phase of launching the VM sets up any network connections, according to whether those use NAT from the host, or are bridged. In the standard option of NAT, the VM doesn’t have its own IP address, but shares the host’s using Network Address Translation. Bridged Networking gives the VM its own IP address, which is considerably more versatile, and functions as if it were another Mac on the network.
Within 2-3 seconds, the VM is working through its pre-boot process, when it loads its firmware and verifies the kernel and its extensions ready for kernel boot. By that time, log entries on the host reduce, and those in the VM trace the progress of the kernel as it gets macOS running in the VM.
There’s considerable additional information on my Virtualisation page, and I’ll soon be looking in more detail at VM performance on CPU cores and the GPU.


