Sonoma’s lost versions bug: what it is and how to safeguard versions

This article provides a full explanation for the serious bug affecting macOS Sonoma 14.4 that was reported here by JK, and which I have reproduced and reported to Apple in FB13691058, dated 18 March 2024. It also provides a general workaround that allows you to preserve document versions robustly.
Requirements
You will only encounter this bug if all the following are true:
Your Mac is running Sonoma 14.4. It certainly doesn’t affect Ventura, and tests with previous versions of Sonoma didn’t demonstrate it either.
You move files to iCloud Drive that have saved versions associated with them. Versions are normally created automatically when you save files using apps that work with the version system in macOS. One easy way to check this is to look for a Revert To command in their File menu. If that’s present, it normally lets you browse those old versions of an open document.
iCloud Drive has Optimise Mac Storage turned on, in iCloud settings, so that it runs as a non-replicating FileProvider. That setting allows for the eviction of files from local storage, in the Remove Download command in the Finder’s contextual menu. If that’s turned off, no files can be evicted, and the bug can’t occur.
Reproducing the bug
To demonstrate what the bug does you need to use an app that saves versions, such as Pages, Numbers, TextEdit, or my own free DelightEd. Create a new file, either in your Documents folder or directly in iCloud Drive. Then add some content to that document, and save it. Repeat as many times as you like to build up a few saved version in the file. Check those using the Revert To command to browse those versions.
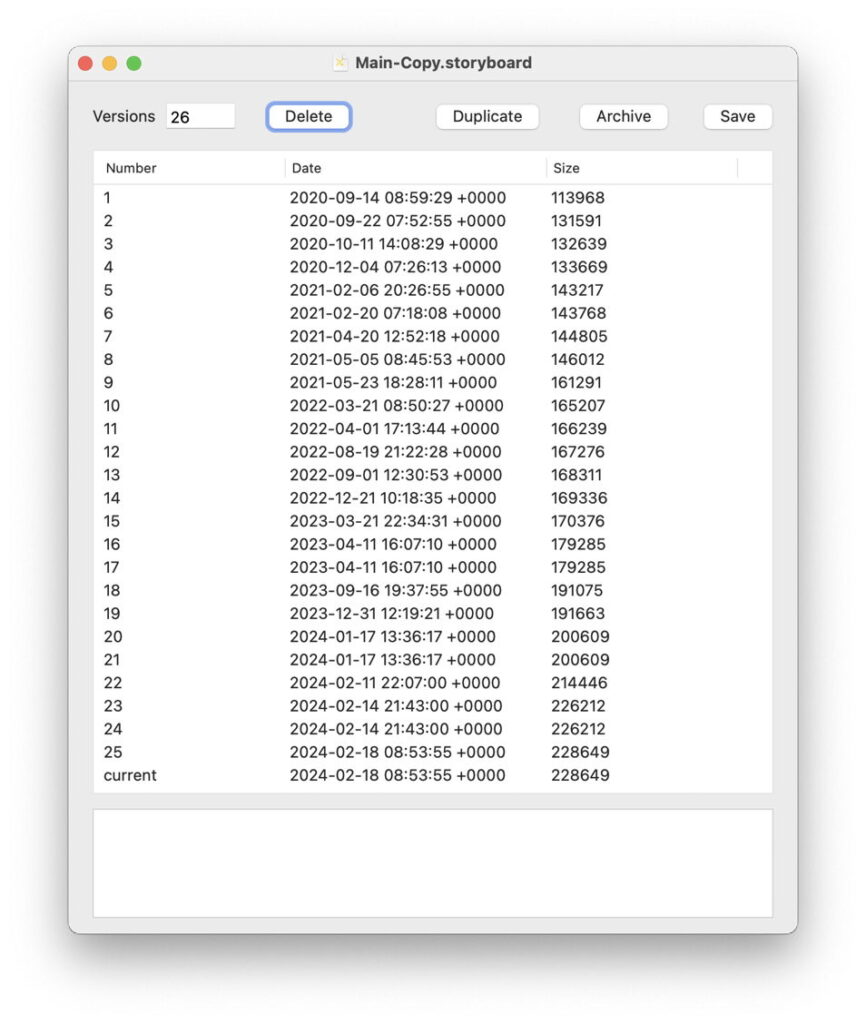
In my example, I found one of the source files for my Mints app with a total of 26 saved versions, and put that in iCloud Drive.
Using my free app Revisionist, you can see the current version at the foot, and 25 previous versions going back to 14 September 2020, all available through the Revert To command.
Here I also check that file’s inode and other details, when it’s in iCloud Drive, using Precize.
So that file has an inode of 465604076, and was last modified on 18 February 2024.
Now select that file in iCloud Drive, open the contextual menu (Control-click) and there select the Remove Download command. If you don’t see that, it’s because you haven’t turned Optimise Mac Storage on yet. Eviction is quick, and leaves the file with its characteristic blue icon to indicate it needs to be downloaded again before you can use it. After a minute or so, click on that icon to download the file again.
Checking the materialised (downloaded) file, it has exactly the same inode of 465604076, and was last modified on 18 February 2024, just as before.
But where have all those 25 previous versions gone? I’m afraid the answer is into the great bit-bucket in the sky: they are lost and gone forever. Because no backup software can back up saved versions, you won’t find them in your backups, or in copies of that file on other volumes or disks, because versions always remain local to a volume. As they don’t get copied up to iCloud Drive, you also won’t find them in its 30-day backup.
How to archive versions with Revisionist
If file versions are important to you and you don’t want to lose them in iCloud Drive or anywhere else, my free app Revisionist provides a complete set of tools for working with them, including archiving all the versions of a file or document so they will survive passage through Windows, Linux, or ExFAT storage. Here I’ll just show the process of archiving and unarchiving to reconstitute a file with all its original versions intact.
Start by opening the original document or file in Revisionist.
All its versions are now listed, and you can preview any of them using QuickLook. Click on the Archive button at the top.
You’re then prompted to set the name and location of the folder to contain all the archived versions. So long as Revisionist has permissions and privacy access to that location, it will then create a folder there with those versions inside it. You may need to add Revisionist to the Privacy & Security settings for Full Disk Access to make this easier.
The resulting folder can then be compressed and archived into a single file, or simply moved to any new location, including iCloud Drive, or another volume or disk. The only limitation here is that these versions don’t contain the same extended attributes as the original file; if you want to preserve those too, you’ll need to add a copy of the current file containing them.
When you want to reconstitute the original file with all its saved versions, use the UnArchive command in Revisionist’s Window menu. You’ll then be prompted to select the folder containing the archived version files.
Next, Revisionist will prompt you to set the name and location of the reconstituted file.
Its UnArchiver window then lists:
the source folder used,
the destination file set,
each of the archived files used,
each of the versions added to the destination file.
The original archive folder is left untouched.
Happy archiving!


