Why you should run a Content Caching service
I don’t run an enterprise network, or even something the size of a modest office, but one service I wouldn’t do without is Content Caching. All told, my always-on iMac Pro serves a total of three other Macs, two iPhones and an iPad, across two different iCloud accounts. So why am I so keen to run my Content Caching service? Does it really save much for the effort involved?
What it serves
To discover what it could save you, look carefully through the list Apple provides of what Content Caching serves. For me, the big savings come in:
macOS and iOS updates
App Store app updates
iCloud documents.
You may also find other Apple media and iCloud Photos valuable.
Although it’s always good to minimise the amount you have to download from Apple’s servers, the most noticeable gain comes in speed. Large app updates on more than one Mac are much faster, as instead of each coming from a remote server, only the first download does. I keep a copy of the current release of Xcode on each of my Macs, and only one copy of each update now has to be downloaded, as the other three Macs get theirs from the Content Caching server as fast as my network will carry it. Add to that Pages, Numbers, Keynote, and Apple’s Pro apps and that’s a lot of updates.
iCloud benefits can also be substantial, in terms of the time needed to sync. Although I don’t keep many large files in iCloud, syncing them across all Macs and with my iPhone is almost instant, I presume because all they have to do is sync with the Content Caching server, leaving that to sync up to iCloud servers as and when it can.
How it works
The Mac hosting the server doesn’t have to be running and awake all the time, as it doesn’t automatically download anything, it merely caches for all the Macs and devices connected to the local network.
My server is left running almost all the time. When Apple releases a macOS or security data update, it or one of my other Macs will download that update from Apple’s servers. Once that’s done and installed, any other Mac that looks for that update will ask the Content Caching server whether it’s available, and be offered the update direct from the server. You don’t have to configure those clients individually: when they start up or join the network, their macOS or iOS will automatically detect the server and know to ask it for all content it might already have cached. If they can’t connect to the Content Caching server, then their request will instead go to Apple’s servers. This is all completely transparent to the user.
The only time that I have to think carefully how I update my Macs is when there’s a large macOS update available. My preferred strategy is to:
Update another Mac first. That update will then be cached on the server.
Using that cached update, update the Content Caching server next. I do that while the first Mac is still installing its update.
Once the Content Caching server has installed the update, start a third Mac so that it too can update from the cached copy, and the fourth Mac shortly afterwards.
Apple provides full details, and information as to how you can configure and use servers in more elaborate networks, in its Platform Deployment Guide.
Remember that your Content Caching server doesn’t have to be running all the time: it works best if it’s running when Macs and devices on your local network are likely to want to install updates and sync with iCloud, but when they’re shut down or asleep, your server can get some rest as well.
Setting it up
All you need is your server, running a reasonably recent version of macOS (which can be older than that on other Macs and devices), and with a hundred GB or more free on an external disk, which can be a hard disk if you wish. One thing I’d be wary of is placing its cache on the same disk as your Time Machine backup store. Although that can work, and you should in any case limit how much space is allowed for the cache, it could result in conflicting demands for shared free space.
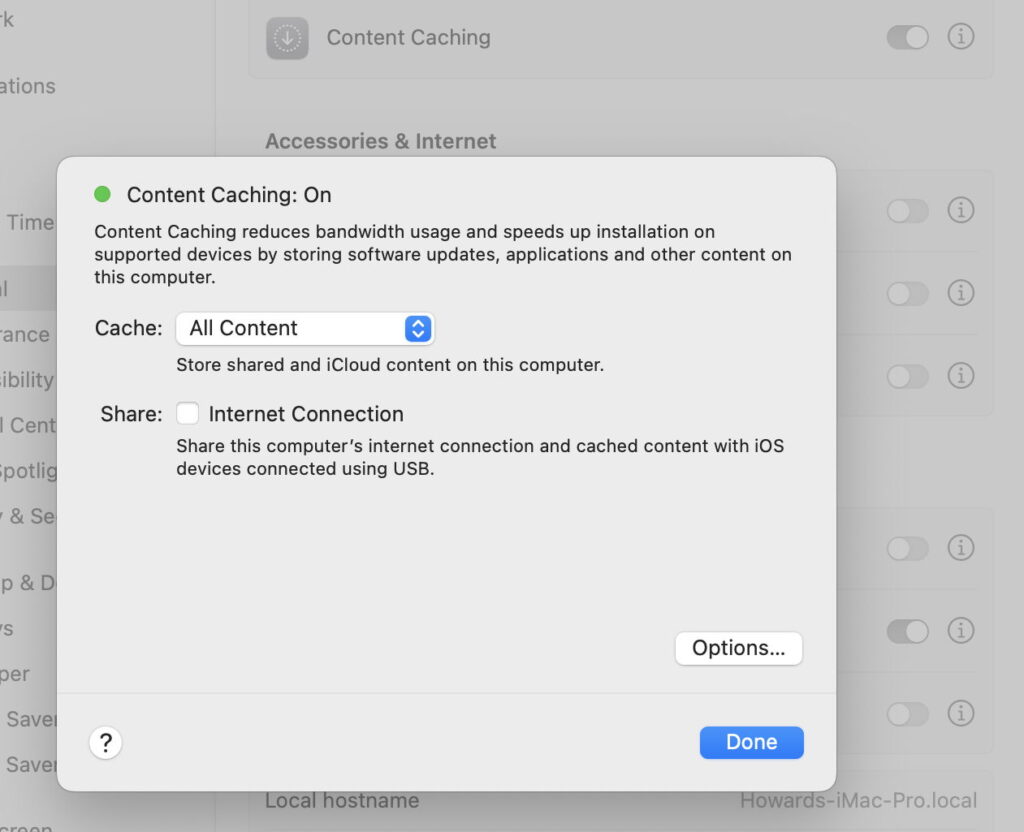
Once you’ve got your hardware ready, open the Sharing section in General settings, and click on the Info button for Content Caching.
In the first window, set it to cache All Content, unless you’re not going to use it for iCloud. You probably won’t wish to share the Internet Connection, but will need to click on the Options… button.
That takes you to the most important part: click on the Edit… button to select the cache store on your external disk, and set the slider or popups to the maximum size of the cache. As you can see here, mine is set to a maximum of 1 TB, but is currently only using a tenth of that, including over 10 GB for my iCloud content.
When you’re happy with those settings, click OK until you return to the Sharing settings and turn your Content Caching server on. There will be a brief flurry of activity as it initialises the service, then the server will just get on with its job transparently.
Monitoring
Once your server has done a bit of work providing your Macs and devices with updates and synced contents, open Activity Monitor. You’ll now see an additional view option Cache at the right. Select that and you can see how much content has been served over the previous hour, day, week and month. Because we’ve gone a while since the last macOS update, my server hasn’t had much to do, and has only saved my systems from downloading around 7 GB in the last month, but that will change once Apple releases macOS 14.5 and the next version of Xcode.
Summary
Running your own local Content Caching server is simple and works transparently.
Content served includes macOS, iOS and security data updates, and iCloud content.
Not only does a server minimise downloads, but it makes them faster, and makes iCloud syncing quicker and more reliable.
A Content Caching server doesn’t need to be running all the time, but works best if it’s available when other Macs and devices are likely to want updates, and to sync iCloud content.
The server can cache to a hard disk, and doesn’t need much more than 100 GB to do a valuable job.